Wednesday, May 29, 2013

Rich Mullins Movie & My Firstborn's Namesake

Pin It Now!

My hubby and I were so excited to find out that a Rich Mullins movie is in the works!

Honestly, I don't even think I knew who the guy was until I started dating my hubby. (Which was a looooong time ago - like 1994!) Because he loved Rich so much, it was hard for me not to become a fan, too. :)

I was fortunate enough to be able to go to one of his concerts shortly before his death on Sept. 14, 1997. I truly enjoyed hearing him and the Ragamuffin Band play in person. Loved how real Rich seemed to be. And how in love with Jesus he was. And how he seemed to really grasp how incredible God's grace is.

I can remember like it was yesterday how devastated my husband was when we heard the horrible news that Rich Mullins had been in a tragic and fatal accident. Even though my hubby never knew him personally Rich was, in a way, like a mentor to him.

So, in December of '98 when I found out I was pregnant, we decided that if we had a boy we'd name him Mullin -- after Rich Mullins, of course. And indeed, we found out our first child was going to be a BOY!

 
The brand new daddy even personalized one of the scrapbook pages in Mullin's Creative Memories baby album. He included a photo of Rich, Rich's song, "Growing Young," a picture of him putting Mullin's footprints on a Rich Mullins T-shirt, and our reason behind naming our son after Rich Mullins.
 
Here's what my hubby wrote:
 
"When your Mother and I named you after Rich, it had nothing to do with the fact that he was famous or talented or successful. Though all of those things are very true, something far greater set him apart in my life to the degree that I wanted to honor him by giving you his name. Son, as I've told you before, this world is full of liars, and they will do whatever they can to steal your soul, your joy, and your purpose for living. But Rich Mullins told me the truth, and he told it clearer and truer and more beautifully than anyone ever had before. He told me that God was undeniably awesome, that He loves filthy sinners with a reckless, raging fury, and that He is ever watching and waiting for His wandering children to come back home to Him.
 
Mullin, Rich wasn't perfect, and neither are you. Even still, God used his life and his gifts to draw people to Himself and His amazing grace! I pray that, like Rich, you will intimately know the matchless love of Christ and that you will demonstrate that love wherever your life and talents take you."

Our son will be 14 later this summer. It seems like yesterday that I was watching Rich sing live. It seems like yesterday that we heard the news of his death. It seems like yesterday that our son, Mullin, came into this world. Wow, how the time flies.


Right now my son is going through what I am sure many other kids go through when it comes to their names. He wishes it was different. Some people have trouble pronouncing it. Some people ask him to repeat it. And it isn't a very common name, which I like, but I guess when you're a 13-year-old kid, those things are pretty bothersome. Online he's known by half of his middle name, which I admit sounds cool, but he will always be Mullin to me.

It does make me a little sad that he doesn't love his name, but I also went through a similar phase. I wished my name was Misty of all names. I was younger than my son is now, though, when I wanted to change it. Hopefully someday he will come to love his name again.


Do you plan to see the Ragamuffin movie? Here's a trailer for you to watch. We can't wait!


"Love is found in the things we have given up more than in the things that we have kept." ~ Rich Mullins

Tuesday, May 28, 2013

K is for Kinesio Tex® Tape

Pin It Now!


I've been a patient of chiropractors and an employee of chiropractors. I've had back and hip issues since I was 14. Chiropractic care has helped tremendously over the years.

Well, from about the age of 23-33, give or take a couple of years, I didn't see a chiropractor at all. Just wasn't in our budget. My back started hurting again, especially my mid back where a pinched nerved cause quite a bit of pain and irritation. A couple of years ago, I was able to start going to see a chiropractor again due to our flexible spending account. Yea!

So, what does this have to do with Kinesio Tex® Tape? Well, my current chiropractor uses this tool, and I have to admit, the first time it was applied to my back, I had doubts that this tape would do anything. Boy, was I wrong. I love Kinesio Tex® Tape!!

This tape has helped my mid-back and lower back feel much better when I was experiencing chronic pain. Obviously, I can't give all the credit to the tape since I was getting adjusted regularly as well. The tape was icing on the cake!!

Kinesio Tex® Tape is based on the science of Kinesiology. Basically, the tape will lift the skin to increase the space between your skin and muscles. This reduces pressure which helps promote circulation and lymphatic drainage.


The tape can be worn for about 3-4 days and is designed to allow the body and muscles move while assisting rehabilitation. An hour after application, you can resume normal and even athletic activity and shower. It will start to come off after 3-4 days. If the Kinesio Tex® Tape has been applied properly, it will have natural wrinkles when you are in a relaxed state.

It's rather skin-friendly. I didn't have any reaction to it, and I have pretty sensitive skin.

Kinesio Tape can be used to:
  • reduce pain
  • reduce selling
  • reduce muscle spasms  (The tape really helped me with this one!)
  • support tired, weakened, and strained muscles
  • enhance performance of tasks or movement
  • support weak or ineffective joints or muscles
  • protect body parts from injury
  • promote body's natural healing process

What's great about this tape, too, is that you don't have to go to a chiropractor to get it or use it. It can be ordered on Amazon for a decent price. I am definitely considering ordering some since I am having to take a break from chiropractic care to pay for my kids' braces. :(

It comes in different colors - I've included two of them here:


           Red                   Beige


The information in this post comes from a pamphlet from my chiropractor's office.


Blogging Through the Alphabet
Be sure to check out other K's at Ben and Me!

Also linking to Works for Me Wednesday since Kinesio Tex® Tape works for me!!


Image 1 source
Image 2 source
Affiliate links included in this post

Saturday, May 25, 2013

J is for Jam {Homemade Strawberry - Cooked and Freezer}

Pin It Now!
 
 
My friend, Heidi, from church loves to make jam, and she's really good at it, too. This past Thursday after Bible Study, she was gracious enough to teach me how to make homemade strawberry cooked and freezer jam. I swore I'd never attempt jam-making again after my epic apple jelly fail last summer, but that was before someone was willing to walk me thru the process step-by-step. Heidi made it look so easy!


Instead of giving step-by-step instructions here (Thorough directions can be found on the Sure Jell package), I am going to list a few of Heidi's tips for successful jam making.


1. First of all, Heidi uses 100% Natural Sure Jell Premium Fruit Pectin for her homemade jam.
 
2. Use a potato masher to crush fruit.
 
3. Measure exactly all ingredients according to package instructions.
 
4. Use suggested butter to cut down on foam.
 
5. After boiling, skim as much foam off the top of the jam as possible.
 
6. Use new metal lids for cooked jam.
 
7. It's helpful to have a second pair of hands the first time you make jam.
 
8. Basically, just follow the step-by-step directions on the Sure Jell package.
 
 
Thank you, Heidi, for showing me how to do this and for sending me home with all kinds of yummy jam! I can't wait to make my first batch, maybe peach jam with my mom's homegrown peaches? I hope it turns out as yummy as Heidi's!
 
Oh, and just so you know, cooked and freezer do taste a bit different. I love the texture of the cooked, but the freezer is a little more sweet and fresh tasting. Freezer jam is easier to make, too. Heidi doesn't recommend using peaches for freezer jam, though, as it doesn't set very well.
 
I still need to purchase a few canning items, like the potato masher, jars, that metal thing you put in the pan, the canning tongs, and the canning funnel. Heidi says Wal-Mart sells them inexpensively, so I will try there first.
 
What are some of your homemade jam tips? And what is your favorite kind?
 
Blogging Through the Alphabet
 

Thursday, May 23, 2013

Simplified Pantry: Paperless Home Organization {Schoolhouse Crew Review}

Pin It Now!


Simplified Pantry sent me 3 eBooks to review:

 
 I am going to focus on Paperless Home Organization, a 75-page eBook by Mystie Winckler, because I need it!

Desperately.

Overall, I am a very neat, clean, and orderly person, but when it comes to paper, I quickly end up in a swirling pool of chaotic clutter. I am way behind the times and a little scatterbrained when it comes to organizing lists and papers. (My hubby is the paper organizer here!) I still have a huge, traditional calendar hanging up in my laundry room, I keep about 5 or 6 different notebooks in which I write all kinds of information, and when I am out and need to jot down a quick note, I'll grab any old piece of paper from my purse (like an old receipt) instead of using my smartphone. *sigh*

Reading Mystie Winckler's e-book really inspired me to begin using my smartphone to its full potential. I'm taking baby steps, but I am on my way to making a lifestyle change in the area of paperless organization.

 photo book_cover_zpsea3c0ac1.jpgSo, whether you're like me and need to start organizing digitally from scratch, or whether you just need to fine tune your existing digital system, Paperless Home Organization: A how-to guide to creating a digital homemaking binder is a great and inexpensive resource. For just $3.99, you can learn to put your gadgets to good use! (Available in Kindle and .pdf formats.)

To begin, Mystie shares about the benefits of a having a home management binder and the benefits of going paperless. Also right off the bat, she declares that it's best to keep things SIMPLE. I like that. Instead of having a bazillion apps, she uses 3 free online tools and their corresponding apps to manage everything: Evernote, Remember the Milk, and Google (mail and calendar). These specific applications don't force you to use a certain type of structure. Instead, they act like blank canvases allowing you to tailor them to fit your own needs.

After explaining that her methods are based upon the concepts in David Allen's bestseller, Getting Things Done, she walks you through the process of setting up the 3 accounts mentioned above: Evernote, Remember the Milk, and Google. It was completely painless to set up all the accounts!

Next, Mystie explains each of the 3 tools in detail and helps you implement them into your daily routine. I am highly visual, so I really appreciated all of the screenshots and photographs throughout. As always, her goal is to keep things as simple as possible. Pictures help with that! :)

Evernote is what Mystie calls "the meat of the system." It's the digital replacement for all of your notebooks, filing cabinets, binders, etc. Most of your information will be stored here and best of all -- it's searchable!

Because Evernote is a daily used source that will be referenced throughout the day, she spends quite a bit of time discussing the principles of Evernote, how to use it, and how to get things done with it. She also explains how to use it as a filing cabinet and gives a list of examples of material you might want to digitally file.

Mystie uses Evernote to manage all of her information regarding homemaking, housekeeping, and homeschooling as well. She includes sample notes and structures for all of these. If you are a Blogger, you can even use it to brainstorm and draft posts.

Remember the Milk is a task management program that basically serves as an online to-do list. To keep from overwhelming you, Mystie gives step-by-step instructions on set-up and use. She explains principles for keeping Remember the Milk simple, consistent, and useful and shares many valuable tips and tricks.

Google is the program Mystie uses for her email and calendar. All of her email management instructions will be specific to Gmail, so if you use a different mail application, she suggests creating a Gmail account and forwarding all of your mail to your new account.

First, she explains how to forward notes directly to Evernote. Next, she shows you how to set up labels and create filters to manage your inbox, and for optimal Gmail performance, she recommends choosing several specific settings. She continues with Gmail principles, tips, and tricks which will help you manage all of your information simply and effectively.

Google calendar is a feature that is essential to staying organized. Having an online calendar makes it easier to add repeating events. Plus, if you need to change something, you don't have to erase and rewrite! Again, Mystie walks you through set up and shares lots of principles, tips, and tricks to help you keep your calendar current, consistent, and effective.

At the end of her book, she gives advice on how to keep everything running with daily and weekly reviews.
 
---------------------------------------------------------------------

As I began reading this eBook and setting up the recommended web accounts, I called my husband over to ask him a question about something I was working on. He gave me that why-are-you-doing-this look.

Uh, oh.

Basically, he told me that it would be more beneficial for me to just use what we already had. We use Outlook, and there's already a calendar and a tool called, OneNote, which I am assuming is similar to Evernote. Those 2 apps were already on my phone. Go figure. I told you I was clueless!

I decided to keep using Outlook for my email and to start using it for my calendar and list-making. (And this was already after I had typed everything for this month and next month in the Google calendar. Oh, well.) I made a couple of goals for myself to get me started on the paperless venture: 1.) start keeping a grocery list with OneNote, and 2.) start using my Outlook calendar instead of my wall one.

I am happy to report that for the past month I have completely ditched the paper grocery list for a paperless one! Now that I've done it, I realize how much easier it is to make the list! Wow, it's definitely easier to add items in as I think of more things, it's a lot neater, and it's so easy to check items off as I shop at the store.

 
I am also happy to report that I have met my other goal. I've been very consistent with using my paperless calendar, and I am finding that it really is easier than using my wall one. Getting reminders on my phone is great, too. My wall calendar never did that!
 
Also, I've been using OneNote to keep other lists besides the grocery list. I am keeping several lists on there now: Books I Want to Read, Read Alouds 2013, Blog Post Ideas, Homeschool Supplies Fall 2013, Quotes, etc. Seriously, all of these kinds of things used to be written on paper whenever and wherever! Thank you Mystie for inspiring me to stop using so much paper and to start getting it all organized!
 
I am not sure yet whether or not Remember the Milk is going to work for me. I don't keep a home binder/daily to-do list at present, so I feel like it's a lot of extra work for me to start a digital one. I might look into it more once this last week of homeschool is over. :) It's still a little overwhelming for me to be making such a drastic change.
 
------------------------------------------------------------------

Overall, this eBook was very helpful and inspirational. It's clearly presented and extremely thorough. If you are trying to go paperless and need help organizing everything, I think Paperless Home Organization will help you do just that!

*Special Offer: Mystie is offering a 30% discount on all of her eBooks from May 20 - June 3! Enter TOS2013 during checkout.

To find out more about this homeschooling mom of 5, visit Mystie's blog, Simply Convivial.


Photobucket


Friday, May 17, 2013

Joyce Herzog: Budding Authors and 6 Weeks to Understanding Grammar {Schoolhouse Crew Review}

Pin It Now!


Joyce Herzog is an experienced teacher in both public and private schools and has been helping homeschool families for more than 25 years. She's the author of various educational materials which help parents focus on meeting their children's unique and individual needs. Her philosophical approach to learning works well with many different types of learning styles including unschooling, relaxed homeschooling, Charlotte Mason approach, and the "real book" method.
 
Her website offers valuable information such as educational support, products, and services, and she also includes links to other helpful resources.

Recently, the Schoolhouse Review Crew had the privilege of reviewing several of her educational products. I received the Budding Authors set and 6 Weeks to Understanding Grammar.


Our review package included the 5 spiral bound workbooks in the Budding Authors series:
  1. Step Into Writing  ($10)
  2. Step On Into Writing  ($10)
  3. Adventures in Writing  ($10)
  4. Then and Now  ($12)
  5. Writing U.S. History  ($15)
 We also received the 40-page softcover, 6 Weeks to Understanding Grammar. ($12)


Budding Authors is a step-by-step writing skills series which starts off with simple sentences and advances all the way to researching people and events in American history. As your child completes each book, he will be able to see his progress and at the same time create a nice keepsake.

These books can be used alone or they can be used with the Scaredy Cat Reading Stystem.


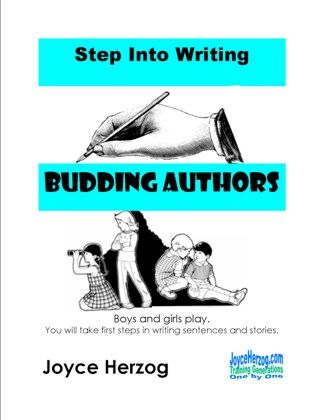
Budding Authors Book 1: Step Into Writing (Sample pages)

In this book, your child will take his first steps in writing short sentences and short stories. This book deals primarily with short vowel words, number and color words, and what Joyce Herzog calls sight words. To help your child develop thinking skills, verbal expression, and vocabulary, three types of pages are included: Copywork, Dictation, and Experience Story. There is supposed to be a Dictionary page included to help your child with unfamiliar words that he will encounter in the book, but it looks like this page was left out of the book I received and included instead in the second book. There are 41 pages in the first book.

* I had my 7-year-old daughter skip the first book since it was too easy, so I will go into more detail about the types of pages below.


Budding Authors Book 2: Step On Into Writing

I will be focusing on this particular book in the series since it's the one my daughter has been working on during the review period. It follows the same format as Book 1 except for the added page, Write Your Own Story.

So, the main reason I wanted my daughter to start this series is that she really needs extra practice with neatness! She doesn't like to write neatly at all. Also, I've noticed that when she writes she struggles with knowing when a sentence should end and when a new one should begin. Her reading skills are excellent, but it was time to backtrack a little bit on writing skills!

First of all, let me introduce you to the 4 kinds of pages in this book -- (these pages will appear in order over and over again.)

Copywork

On this page, there is a picture and a story which is comprised of four simple sentences. The goal here is for your child to copy the sentences neatly at his own pace paying close attention to capitalization, punctuation, and spelling. The Copywork pages have columns to the right labeled C for capitalization, P for punctuation, and S for spelling. The purpose of this is so you and your child can check each skill. Our own rating system is star, smiley face, minus, and X. One column is left blank for you to choose a particular skill -- I chose to label this column with an N for neatness.

These sentences are very easy for my second grader to read, but again, our focus is neatness right now. A first grader could probably do well using this book.


Pictured above is the type of paper this program uses. My daughter had never written on this kind of paper before, but Ms. Herzog says she believes it's the same type of paper used in Handwriting Without Tears.

Dictation

For this page, you will read four sentences out loud while your child writes them on the paper. Any words you think your child won't be able to spell on his own can be written in the Word Box at the top of the page. Your child is encouraged to try and write one sentence per line, but my daughter sometimes had trouble with this. Some of the sentences did seem too long for the amount of space provided. Since neatness is the main focus for us, I didn't really fault her for it.


Experience Story
 
For this page, you and your child will talk about what you see in the provided picture at the top of the page. You should try to get your child to tell the who, what, and why in the story they make up. He can also come up with a title for the story. You will write down the sentences for your child.
 
It was quite a challenge for my daughter to come up with short, solid sentences. She tends to give lots of information since she loves telling stories. That's a good thing, but for this particular lesson I wanted her to focus on making sure she provided shorter sentences with obvious subjects and verbs. Plus, I wanted her to focus on beginnings and endings. When her sentences get too long, it's harder for her to tell when they should end.


Write Your Own Story!
 
Here, your child will get a chance to write his own simple story based on the picture provided. After discussing the picture with your child, you can write down any words he mentions that you don't think he will be able to spell on his own.
 
I encouraged my daughter to keep the story to about 4 or 5 sentences and to keep them short so she could focus on her three struggle areas: neatness, beginnings, and endings.
 
 
I am pretty pleased with her improvement in neatness, but she tells me she only does it because she has to. Well, at least she's honest! I am really hoping, though, that the repetitive writing practice will spill over into her other subjects.

A Dictionary page is also included at the beginning of the book. It provides pictures and words your child may not know how to spell yet. A blank Dictionary page is provided for you to write down any other words you wish to add.


Budding Authors Book 3: Adventures in Writing (Sample pages)

In Book 3, your child will begin writing down his own thoughts. He will be given a picture prompt and series of questions to stimulate the thinking process. Word Boxes are provided to spark ideas as well; one box contains words that are easier to read and the other contains more challenging words. In the introduction, Ms. Herzog provides several suggestions on how to use the word boxes to help keep your child interested in writing stories. Included at the end of the book are pages in which your child can provide his own pictures to write about. There are 38 pages in the third book.


Budding Authors Book 4: Then and Now (Sample pages)

In Book 4, your child will begin learning how to write paragraphs and make comparisons. The picture prompts in this book are from the early 20th century, and your child will write about how family life and jobs are different today than they were then. There are 42 pages in the fourth book.


Budding Authors Book 5: Writing U.S. History (Sample pages)

In Book 5, your child will be introduced to the skills of researching a topic and taking notes. He will continue to improve upon writing skills while learning about American history. Each pages provides a picture prompt and an accompanying word box to help your child begin researching the particular topic. Topics/events are presented in chronological order starting with the beginning of time to 2010.

I really like that Budding Authors is simply laid out and easy to follow. Each book builds upon what the child has learned and practiced in previous books. It's predictable and flexible. So far, it's helped my daughter to slow down a bit and practice writing strong, neat sentences.


6 Weeks to Understanding Grammar is a 40-page softcover that covers 7 basic concepts in 6 lessons:
  1. Eight parts of speech
  2. Three kinds of sentences and one variation
  3. Five sentence completers or complement
  4. Subjects and predicates
  5. Difference between a phrase and clause
  6. Sentences by function: declarative, interrogative, imperative, exclamatory
  7. Sentences by structure: simple, compound, complex

I chose to read through this book myself to see how to best use it with my children at their varying stages of grammar instruction. Ms. Herzog's philosophy for teaching grammar is different from the one I have followed. She suggests that formal grammar need not be taught until a child reaches a mental maturity level of 12-14 years old.

Well, my children are 13, 11, and 7, and I have already instructed all of them in grammar lessons since the first grade. So, for my two older boys this book would really serve as a review of concepts they've already learned. Since my daughter is just only on the verge of completing second grade, I may be able to implement some of the methods I have been exposed to in this book.

I pretty much spent this entire year teaching my daughter to memorize definitions and learn what Ms. Herzog suggests are abstract concepts. I don't think learning them has done any real harm, but I got a taste of what she is talking about when a couple of weeks ago I was asking my daughter to locate certain types of words (nouns, adjectives, adverbs, interjections, and so on) in a story. She struggled immensely with this task that her grammar lesson was asking her to do. She'd spent all year memorizing and learning about various concepts but was having a difficult time applying what she'd learned. (Except for nouns - she's awesome at identifying those!)

Hmmm, I may have to rethink my grammar teaching methods. I can't really backtrack, so I may try and use this grammar book as a guide and go a little slower next year making sure she masters one concept at a time.

Despite the title, this book is flexible and can be used in any way that best fits the child. For some, this book can simple be a review and won't take 6 weeks to complete. For others, each lesson may take longer than a week to complete. With my daughter, I won't be following the 1 lesson per week schedule!

While I was reading, I noticed that on page 12 the last few sentences were accidentally left out. Ms. Herzog went back to her original writing and graciously sent me the completed paragraph:
 
"Spend a few days working with 2-word sentences. Remind yourselves that there are two parts of a sentence: Subject and predicate. Identify the subject; tell if the kind of word used in the subject is a noun or a pronoun. Identify the predicate; Identify the kind of word in the predicate as a verb. You may like to call it an action word or action verb."

She informed me that this paragraph will be added to the next printing.

My plan is to continue using both Budding Authors and 6 Weeks to Understanding Grammar to help my daughter become a strong writer. If your child could use some help with writing or grammar, you may want to consider checking out these materials for yourself!
 
 Click to read more Joyce Herzog reviews from the Schoolhouse Review Crew.

Photobucket
 

Thursday, May 09, 2013

Marriage is a Walk in a Field of Daisies . . .

Pin It Now!


. . . until you chance upon a hidden snake in your path. Or two or three. Or more.


Ya know, I really didn't have a clue that my fairy tale ideal of marriage would be blown away so easily as a pile of dead leaves. And so soon, too. I guess I have to admit, I was naive. I thought that because we were doing things "differently" it'd be easier for us.

My husband and I are celebrating 16 years of marriage tomorrow, and I must say we've battled quite a few snakes in our little field. I wish I could say we've managed to shoo 'em all away or better yet blow their brains out, but a few have managed to rear their ugly heads and sink their venomous fangs deep into our very souls. Poison spreads fast if you didn't already know.

Over the years, I have come to realize that snakes are as much a part of fields as problems are a part of marriage. You won't ever be able to completely get rid of them. The reality for me is that marriage has been hard, and sometimes life gives you lemons and there's no sugar to make lemonade.

That's just life.

So, what's the remedy for sour lemonade and snake bites? Well, as for sour lemonade, you just have to learn to like it sour. (Just kidding.) As for the snake bites, there are quite a few healing balms: perseverance, faith, hope, love, forgiveness, obedience, trust, steadfastness, and did I say perseverance? The only catch is that these balms cannot come from our own hands, but only from our Heavenly Father's. When He applies the soothing balms, the poison that was meant to cripple can be used make us stronger.

I am so thankful that I married a man whose first love is God through the grace and mercy of our Lord and Savior, Jesus Christ. Seriously, if we weren't standing upon The ROCK, we'd be on that other ground -- the sinking sand one.

I am thankful that my husband is committed to me no matter what and that I "will never, ever walk alone." He'll be with me on this journey (and unfortunately the ever faithful snakes will be, too) until death do us part.

My prayer is that somehow even with all of our faults, our marriage can be a testament to God's grace and glory. Sixteen years ago, I wrote a sweet quote by Christina Rossetti in my wedding album, and I'll write it again today . . .


Happy Anniversary to us.


* I just love my leaf-heart photo. I saw this pile of leaves one morning after a little desert storm, and I ran back inside to grab my phone/camera. I immediately thought of my marriage and how the storms may come and go, but our love will remain steadfast. :)

Wednesday, May 08, 2013

Spanish for You! {Schoolhouse Review}

Pin It Now!


Spanish for You Logo photo spanishforyoulog_zpsa3fadef7.jpg
 
A while ago my children expressed interest in learning Spanish, and what a blessing it's been to review several Spanish programs as a member of the Schoolhouse Review Crew! Recently the Crew had the opportunity to review a couple of Spanish for You!® products.

Spanish for You! is a curriculum developed by Debbie Annett and illustrated by her daughter Amanda Annett for grades 3-8 for home or class use. It teaches children how the language works, and helps them to be able to truly communicate in Spanish. My fifth grader is using Estaciones which is currently one of two themed packages available. The Estaciones theme is seasons. You can click the link to view the Table of Contents, instructions on how to use the program, a lesson guide note to parents, and a sample lesson. All of this information is included in the book, too.

Spanish for You - Estaciones photo spanishforyou-estaciones_zps3adcc14c.jpgWe received a Spanish for You! Estaciones physical book; an audio download (MP3) of the entire book (you can choose to listen to a native speaker or the author); downloadable lesson guides in PDF format for grades 3-4, 5-6, and 7-8; self-checking worksheets in PDF format for all of the grades listed; and flashcard/activity pictures in PDF format as well.

Downloading and finding files is easier than ever with the few changes Ms. Annett has recently made. She says, "All worksheet files are now in folders according to grades - grades 3-4, 5-6, and 7-8. All audio files (native and non-native) are now in folders according to lessons - leccion 1, leccion 2, etc. I divided the non-native audio file into 2 parts so that downloading is faster and easier."

This entire package can be purchased for $64.95. Individual grade levels can be purchased separately for $39.95, and extra books can be purchased for an additional $12.95. The package is a great deal considering the fact that you can use it with multiple children.
 
Ms. Annett developed Spanish for You!while she was teaching Spanish classes at a homeschool co-op. She noticed that no single curriculum seemed to meet the many needs for teaching Spanish at the 3-8 grade levels. With Spanish for You!, she meets the following needs:
  • Ability to teach many grade levels the same content at the same time
  • Audio of entire book
  • Affordable for families, co-ops, and schools
  • Helps children develop fluency
  • Prepares children for high school Spanish
  • Teacher-friendly - no need to know Spanish

In each package, children learn:
  • key language components
  • pronunciation
  • useful vocabulary
  • verb conjugation
  • syntax
  • grammar concepts
  • sentence building

All of these concepts are learned through reading, writing, listening, and speaking activities/worksheets and games.

Spanish for You! is not based on completing levels, rather the more packages your children complete the more components they know. This gives them the ability to put together everything they've learned which in turn helps them to be able to communicate more effectively. So, the packages can be completed in any order. As I said before, there are currently two available, but a third will be ready in June.

There are five lessons in Estaciones which cover the calendar and weather, fall and school, winter, spring, and summer. Each lesson is broken down into several weeks. For grades 5-6 there are a total of 24 weeks which can definitely be spread out over an entire school year. This book is designed to be used 4 days per week but can easily be adapted to fit any schedule. My son chooses to work on Spanish Monday-Thursday, so the suggested 4 day schedule works well for him.

Before beginning Estaciones, parents should read the instructions for using the curriculum in the home and the Lesson Guide Note to Parents. There are several reference pages before the actual lessons begin. The reference section includes:
  • The Alphabet
  • Common Words and Phrases
  • Commands
  • Making and Practicing Flashcards
  • Games and Activities

Before jumping into the lessons, you may want to have some of these extra materials on hand:
  • Colored card stock
  • Scissors and glue
  • Dry erase squares and markers
  • Index cards
  • 2 fly swatters
  • Items for marking a bingo card
  • The board of any board game

So far, we've gotten away with using index cards only. Because my fifth grade son is the only one using this curriculum right now, we don't need supplies for games that require more than one person.


How We Are Using Spanish for You!

Beginning on Monday of each week, I give my son the 5-6 grade lesson guide for the appropriate week. Each lesson guide consists of one sheet of paper. I have already printed all 24 weeks and am keeping them in a folder, but I only print the worksheets my son needs by the week. (I just follow the lesson guide to know what to print for each day.) I have also printed all of the flashcards onto white card stock for each lesson. (Less than 10 pages.)

Basically, all my son has to do is follow the simple, detailed lesson guide in the order the material is presented. It's divided into days 1, 2, 3, and 4. Really, it's extremely easy for him to follow on his own. Here's a sample of what a day might look like: (taken from week 6)

Day 1:
  • Read p. 10 in book with audio
  • Do Learning Your New Vocabulary p. 10 - Making Flashcards part.
  • Optional Extra Challenge: Write the conjugations for the following verbs - rastrillar, saltar, trepar. (Look up their meanings.) Use what you know about conjugating mirar to help you. Just do your best!

At his age, he is doing everything on his own. He does ask me to help him review his handmade flashcards every once in a while, though.


 I am amazed that after only 4 weeks my son can easily write in Spanish a few sentences about what the weather is like in Mexico City. When I asked him to translate for me, he didn't miss a beat! I asked him if I could record him speaking the sentences in Spanish, but he'd have no part of that. However, he did have fun editing the following photo of himself. :)

 
Here's what my crazy boy had to say about Spanish for You!: "It's good and it's easy. I can do it on my own and there's not a lot of writing. I can really say stuff and am learning a lot of words."
 
He did tell me that he doesn't like having to grade his own work. I actually think it's great that he's supposed to check his own work because then he really has to look at what he misses, and he can correct it right away.

I am quite pleased with this Spanish curriculum and plan to continue using it with my son. Next year, I will pass it on to my daughter who will be in third grade. Right now she is finishing up a different Spanish program that just teaches the very basics, so she should be good and ready for Spanish for You!.
 
Click to read more Spanish For You! reviews from the Schoolhouse Review Crew.
 
 
Photobucket


Tuesday, May 07, 2013

Cheesecake Cookie Cups

Pin It Now!

I don't make these often, but they are such a fun and pretty dessert!


Cheesecake Cookie Cups


Ingredients:
  • 12 pieces Nestle® Toll House® Refrigerated Chocolate Chip Cookie Bar Dough
  • 1 pkg. (8 oz.) cream cheese, softened
  • 1/2 cup sweetened, condensed milk
  • 1 large egg
  • 1 tsp. vanilla
  • 1 can (21 oz.) cherry pie filling (or whichever flavor you prefer)

Directions:

Preheat oven to 325°. Line muffin tin with paper muffin cups.

Place one piece of cookie dough in each muffin cup.

Bake for 10-12 minutes or until cookie has spread to edge of cup.

Beat cream cheese, sweetened condensed milk, egg, and vanilla in a bowl until smooth. Pour about 3 TBSP cream cheese mixture over each cookie in cup.

Bake for an additional 15-18 minutes or until set. Cool completely in pan on wire rack. Top with pie filling and refrigerate for at least 1 hour.

Peel off paper and enjoy!


Cheesecake Cookie Cups are the perfect ending to a yummy dinner of Baked Parmesan Chicken with Spinach, Italian Green Bean Side Dish, Mashed Potatoes, and homemade yeast rolls. Haven't posted a recipe for those yet, but I need to. They are crazy amazing!!!


*Linked to Tasty Tuesday, Tempt My Tummy Tuesday, Try a New Recipe Tuesday, and Works for Me Wednesday.

Joining a new linky:
YOUR BLOG NAME

Monday, May 06, 2013

Papa's Pearls {Schoolhouse Review}

Pin It Now!
 
Homefires presents:

 photo papaspearlslogo_zps7e410f29.jpg
 
Ninety years ago in the city of San Francisco, a baby boy was born 2 months premature. His parents named him Carol Joseph Flynn after King Carol I of Romania. Carol Joseph Flynn grew up and became the father of Diane Flynn who affectionately called him "Papa." Well, Diane grew up and became Diane Flynn Keith, began a family of her own, and eventually became the author of Papa's Pearls: A Father's Gift of Love and Wisdom to His Children and Grandchildren.

Diane Flynn Keith was inspired to write this book after her papa's death in December of 2011. Inside, she shares life lessons and practical bits of wisdom that were handed down to her and other family members by her father. Diane says, "Papa's life was a demonstration of his belief that daily exercise, the power of positive thinking, support from family, and meditation and prayer helps maintain a healthy body, mind, and spirit."
 
She continues her father's legacy by sharing in her book his insights on how to live a positive, productive, and satisfying life. Each chapter revolves around several of Papa's sayings and real life stories that inspire readers to work hard, build loving relationships, and live life to the fullest. Some of the sayings for which he was known are:
     photo papaspearls_zps509cd1df.jpg
  • "What's the worst thing that could happen?"
  • "When you fall down -- get back up!"
  • "Tell yourself you like it."
  • "You gotta roll with the punches."
  • "Keep a foxy pocket."
  • "I am so grateful I have a wonderful family -- there are no Kook-A-Loonies."
  • "I love you. You know that, right?"

Just to name a few.

 I found it interesting that "Papa" didn't always have it so easy. Early on in life, he experienced much hardship and adversity which led to misbehavior in school and eventually to involvement in criminal activity. What he thought was the worst thing that could happen to him actually turned out the be the very thing that helped him to turn his life around.

Through discipline, hard work, and a good attitude, Papa was able to lay a foundation for a successful and happy life. He was a man who put family first, proclaimed his love often, and made life fun. I didn't always agree with all of his tactics, but I liked that he believed that you could learn from both success and defeat and realized that the process was more important than the outcome and that he thought that "believing in yourself is important for success, but it doesn't mean a thing unless you back it up with action." He really seemed like a neat guy, someone everyone would want to know.

The book, which is just a little over a 100 pages, was a quick and easy read. Quite enjoyable, too! As I was reading, I could truly feel the love and admiration Diane has for her father. It's obvious that her papa's pearls of wisdom have greatly impacted her life. Her father's love and encouragement have helped Diane become the successful woman she is today.

Diane is a veteran homeschool mom who began publishing Homefires: The Journal of Homeschooling in 1992. This resource is now available online at www.Homefires.com. Besides Papa's Pearls, she is also the author of Carschooling: Over 350 Entertaining Games and Activities to Turn Travel Time into Learning Time. She publishes a free e-newsletter, Clickschooling, in which she provides a daily curriculum idea or activity that is available online, and she's also the founder of www.UniversalPreschool.com, a resource to help parents teach their little children (ages 2-5) at home.
 
An autographed copy of Papa's Pearls: A Father's Gift of Love and Wisdom to His Children and Grandchildren is available through Homefires for $21.97 which includes shipping. The book is also
available for less on Amazon in paperback or Kindle edition.

Before I recommend this book, I wanted to point out that there is an expletive included in a quote that may be offensive to some. I think, too, that Papa's Pearls is more for parents (adults) than kids. It could certainly be read aloud and discussed as a family, though. I most likely won't be reading it aloud at this time, but I do hope to implement some of the wisdom shared, especially the part about Papa being an overachiever but having a relaxed personality! If only those two traits could come together for me, I know my family would be especially grateful. :) I try, really I do.
 
 
Click to read more Papa's Pearls reviews from the Schoolhouse Review Crew
 
 
Photobucket


Thursday, May 02, 2013

G is for Give (and how to teach your kids to do it cheerfully)

Pin It Now!
Blogging Through the Alphabet
 
A couple of years ago, I wrote a post titled, "The Very Ugly Can."

Basically, I wrote about how in December of 2010, our family decided to put out a "Giving Jar." All month we put money in it, and then before Christmas, we blessed a chosen family with gifts. Well after that, I thought I'd try setting out a giving jar all year long. :)

When we first started this, I only made 2 rules:
  1. Once you put money in, you can't take it back out.
  2. The money in the jar can only be used for charity and the like.

We started this whole thing when finances were extremely tight. I didn't think I'd have anything much to give, but I felt led by God to do it. By faith and obedience, what started out as ugly on the outside (just a big, silver coffee can) quickly became beautiful on the inside. To read the back story, click the above link.

Fast forward to the present - April 2013. Our giving jar, what we affectionately call the Money Bucket, is still going strong. Honestly, I wondered if the whole idea would sort of fizzle out over time, but I stand in awe of how God continues to use this small thing. I am amazed at how spare change and dollar bills add up over time.

 
*All you need is some type of container and some willing hearts! (I covered a large coffee can with scrapbook paper.)


Since starting the Money Bucket, It's been especially rewarding to see how God leads my kids to cheerfully participate in giving. Just by observing my kids in the midst of this experience, I've come up with a few reasons why I think they are able to give cheerfully.

1. They are not forced to give.

We let our children choose whether or not they put money in the bucket. We want their actions to be Holy Spirit led in this area, not parent led. It's not that we don't ever encourage or talk about giving. We do. We teach what the Bible has to say about giving, and that all Christians are called to give in some way.

2. They are not required to give a certain amount.

This is kind of an extension of the first point - obviously if we don't force our children to give, then we don't require a certain amount either. Here's why: My husband and I believe that according to the New Testament, believers are not required to give a certain percentage of their income. We believe this falls under the requirements of the Old Testament Law. I am certainly not trying to stir up a debate or anything, I am simply giving insight as to why we personally don't require a certain amount from our kids.

Our belief is not an excuse to get out of giving. To the contrary, we believe Christians are free to give more. The more money you've been blessed with, the more money you are free to give away. It's not about stopping at a certain amount or percentage, it's about giving when God leads. And sometimes it's about obeying even when we think it's going to hurt a little. (Like when I felt led to start the giving jar!) We truly want to impart a spirit of giving to our children by teaching them to listen to the Holy Spirit.

3. They are included in giving decisions.

For the most part a lot of the ways in which we give our "Bucket Money" is the same, and our kids know how the $ will be spent. They know we use it to buy our Compassion child birthday and Christmas presents, they know I like to give to Mercy House every month, they know we use it to be able to prepare meals for people from church, and they know we try and donate items to an orphanage that our church supports.

This past Christmas, we still had some $ left in our bucket, so for the first time the kids and I decided to pick out items from the Gospel for Asia gift catalogue to donate to needy families. I let the kids choose what items they wanted to give. I could tell that it was real blessing for them to be involved in that.

Other opportunities to give come up throughout the year as well. We can't do everything, but it's truly been wonderful watching God work with what we have.

4. They are kept up-to-date on how our family's willingness to give is blessing others.

I always read aloud or have my kids read the letters from our Compassion child. He always sounds so incredibly grateful. I try to keep them up-to-date with what is going on at the Mercy House. I keep a list in the bucket of all of our donations, not so we can boast and brag, but so that we (my kids especially) know exactly how the $ is being used.

5. They are encouraged to keep what they give between God and themselves.

It's not that it's taboo for someone to see them dropping coins in the Money Bucket, but we just want to keep boasting and bragging about how much so and so is giving out of the picture. When we're all rolling coins together or adding up dollar bills, we don't talk about who gave what. It's all God's money, and it's all being used for great causes! It's much easier to be cheerful when the focus is NOT on ourselves. :)

I am so thankful God put it on my heart to start this. I think it's great that my kids get to really experience the joy of giving. Hopefully starting the habit now will make it easier for them to keep the habit throughout their lives!

How do you teach your children to give generously?


Remember this: Whoever sows sparingly will also reap sparingly, and whoever sows generously will also reap generously. Each man should give what he has decided in his heart to give, not reluctantly or under compulsion, for God loves a cheerful giver.

                                                                                    ~ 2 Corinthians 9:6-7


LinkWithin

Related Posts Plugin for WordPress, Blogger...