Pin It Now!
Alright, so anybody who knows us knows our middle child loves to make songs about SODA! (Not that we let him drink it all of the time.) Well, he's now venturing into the wonderful world of videos.
Y'all, I think I missed my calling in life . . .
I just love it when my kids use their free time to create. :)

Friday, August 30, 2013
Monday, August 26, 2013
X is for Xanthan Gum
Pin It Now!
Have you ever wondered what xanthan gum is? If not, then you've probably never read ingredient labels on foods or other household products because it's in a lot of stuff!
I remember looking up this ingredient a long time ago, and really all I could recall was that it acted as some type of "glue" to hold things together. Well, since I needed an X post for this week, I decided to research it again.
So, what is xanthan gum? Hint: It's not something you chew to freshen your breath. It's a polysaccharide. That helps doesn't it? Not so much. A polysaccharide is a complex form of sugar/carbohydrate. Past that, it gets way to sciency for me, so feel free to read more about polysaccharides here if you wish.
What is xanthan gum used for? Well, I was on the right track, I guess, with the whole "glue" thing since it is used in cosmetics to help hold water and oil emulsions together. According to a science dictionary, an emulsion is "a suspension of tiny droplets of one liquid in a second liquid. By making an emulsion, one can mix two liquids that ordinarily do not mix well, such as oil and water. "
Also, Xanthan gum is an excellent thickener. So, when added to foods such as sauces and salad dressings, it helps to make them thicker. It is also used in products such as ice cream and toothpaste to give them a creamy texture. Xanthan gum can be used instead of gluten when using dough for baking bread or other foods. Gluten-free eaters still have to be careful with this substitute, though, because some types of xanthan gum are made with wheat, corn, or soy.
Even oil drillers and concrete pourers use this stuff for making their jobs easier. Who knew that oil drillers used it to make drilling mud thicker, and that concrete pourers needed it to make concrete thicker when pouring concrete under water? Not me.
Xanthan gum is used to treat some types of medical issues, too. Just click the link if you're interested in those. :)
How is Xanthan gum made? Before I bore everyone to tears, I thought I'd add one last Xanthan gum detail that's kind of gross if you ask me. To make xanthan gum, the bacterium, Xanthomonas campestris, is added to glucose or sucrose. That might not mean much to you now, but after I tell you what that bacterium is, it might make you wrinkle your nose just a tad. It's a bacterial species that causes certain types of plant diseases such as black rot in cruciferous vegetables. Yum.
So, the mixture of glucose or sucrose and Xanthomonas campestris ferments for a while, and after that isopropyl alcohol is added to separate the polysaccharide from the mixture. The polysaccharide is dried, ground into a powder, and added to a liquid. Xanthan gum is all ready to use!
As far as healthy for you, I can't say. It was approved for use in foods in 1968 and, it's been approved as a safe food additive in the USA, Canada, Europe, and other countries. In my opinion, there are a lot of things in food that are approved as safe ingredients that aren't really all that safe. Hey, though, Bob's Red Mill sells it, so it's probably not that bad, right?!
 Links:
http://www.webmd.com/vitamins-supplements/ingredientmono-340-XANTHAN%20GUM.aspx?activeIngredientId=340&activeIngredientName=XANTHAN%20GUM
Have you ever wondered what xanthan gum is? If not, then you've probably never read ingredient labels on foods or other household products because it's in a lot of stuff!
I remember looking up this ingredient a long time ago, and really all I could recall was that it acted as some type of "glue" to hold things together. Well, since I needed an X post for this week, I decided to research it again.
So, what is xanthan gum? Hint: It's not something you chew to freshen your breath. It's a polysaccharide. That helps doesn't it? Not so much. A polysaccharide is a complex form of sugar/carbohydrate. Past that, it gets way to sciency for me, so feel free to read more about polysaccharides here if you wish.
What is xanthan gum used for? Well, I was on the right track, I guess, with the whole "glue" thing since it is used in cosmetics to help hold water and oil emulsions together. According to a science dictionary, an emulsion is "a suspension of tiny droplets of one liquid in a second liquid. By making an emulsion, one can mix two liquids that ordinarily do not mix well, such as oil and water. "
Also, Xanthan gum is an excellent thickener. So, when added to foods such as sauces and salad dressings, it helps to make them thicker. It is also used in products such as ice cream and toothpaste to give them a creamy texture. Xanthan gum can be used instead of gluten when using dough for baking bread or other foods. Gluten-free eaters still have to be careful with this substitute, though, because some types of xanthan gum are made with wheat, corn, or soy.
Even oil drillers and concrete pourers use this stuff for making their jobs easier. Who knew that oil drillers used it to make drilling mud thicker, and that concrete pourers needed it to make concrete thicker when pouring concrete under water? Not me.
Xanthan gum is used to treat some types of medical issues, too. Just click the link if you're interested in those. :)
How is Xanthan gum made? Before I bore everyone to tears, I thought I'd add one last Xanthan gum detail that's kind of gross if you ask me. To make xanthan gum, the bacterium, Xanthomonas campestris, is added to glucose or sucrose. That might not mean much to you now, but after I tell you what that bacterium is, it might make you wrinkle your nose just a tad. It's a bacterial species that causes certain types of plant diseases such as black rot in cruciferous vegetables. Yum.
So, the mixture of glucose or sucrose and Xanthomonas campestris ferments for a while, and after that isopropyl alcohol is added to separate the polysaccharide from the mixture. The polysaccharide is dried, ground into a powder, and added to a liquid. Xanthan gum is all ready to use!
As far as healthy for you, I can't say. It was approved for use in foods in 1968 and, it's been approved as a safe food additive in the USA, Canada, Europe, and other countries. In my opinion, there are a lot of things in food that are approved as safe ingredients that aren't really all that safe. Hey, though, Bob's Red Mill sells it, so it's probably not that bad, right?!

http://en.wikipedia.org/wiki/Xanthan_gum
http://dairyfreecooking.about.com/od/dairyfreeglossary/g/xanthangum.htm
http://simple.wikipedia.org/wiki/Xanthan_gumhttp://www.webmd.com/vitamins-supplements/ingredientmono-340-XANTHAN%20GUM.aspx?activeIngredientId=340&activeIngredientName=XANTHAN%20GUM
Wednesday, August 21, 2013
Because You Are Strong: A Study of Godly Strength for Young Men {Schoolhouse Review}
Pin It Now!


Doorposts is a company with which I am quite familiar. Does the If-Then Chart ring a bell for anyone? I proudly displayed that handy dandy discipline chart in my home when my kids were little. Since my kids are no longer little anymore, I was delighted to see that Doorposts was offering Schoolhouse Review Crew members the opportunity to review something for older kids - either Because You Are Strong: A Study of Godly Strength for Young Men or Beauty in the Heart: A Study of Godly Beauty for Young Women. Our family received Because You Are Strong: A Study of Godly Strength for Young Men by Daniel Forster.
If you have young men in your household who are full of strength and energy, stay tuned to see how those traits can be applied and guided according to God's design.

Don't you love the cover of this book? I do! It conjures up feelings of courage, chivalry, and honor, and I can't help but picture a damsel in distress being rescued by a handsome knight in shining armor. (I know, so cliché, right?) Well, the outside of this book does pose a striking image, but it's what's on the inside that counts the most!
Primarily written for young men (ages 10-12 and up), this study focuses on gaining a biblical understanding of strength and learning to practice Bible study skills. Strength is a gift from God and should be used for His glory. By studying God's Word, experiencing various types of Bible study throughout the book, and practicing the methods learned, your young men can indeed stand strong.
This study can also be completed by girls since much of what the Bible says about strength can be applied to men and women alike. There are a few places where alternate questions are provided for girls, though, and they are marked with an asterisk. The alternate questions can be found in the back of the book.
This study can also be completed by girls since much of what the Bible says about strength can be applied to men and women alike. There are a few places where alternate questions are provided for girls, though, and they are marked with an asterisk. The alternate questions can be found in the back of the book.
I love that Daniel Forster emphasizes the importance of studying what God really says and not what we think He says. You can do this by following sound study practices and using reliable resources. Some sound methods of study you can expect to utilize throughout the study or apply on your own are as follows:
- Studying original Hebrew or Greek words as they are used in Scripture
- Comparing one Scripture passage with another
- Observing words and themes that are repeated in a passage
- Outlining the content of a passage
- Accumulating everything Scripture has to say on a certain subject
- Studying people's lives in the Bible and recognizing how their attitudes and actions depict biblical truths
My oldest son who turned 14 this month is using Because You Are Strong on his own. I think this is a great opportunity for him to really begin using the above methods to study God's Word more in-depth!
Because You Are Strong contains ten studies that focus on biblical heroes such as David, Samson, and "mighty men of valor" with a brief review at the end. Each study uses a different study technique and is split into daily assignments that can take anywhere from five to twenty minutes. The ten studies and study techniques taught in the book are as follows:
Because You Are Strong contains ten studies that focus on biblical heroes such as David, Samson, and "mighty men of valor" with a brief review at the end. Each study uses a different study technique and is split into daily assignments that can take anywhere from five to twenty minutes. The ten studies and study techniques taught in the book are as follows:
- Strength for the Race - Devotional study
- Strength with No Limits - Topical study
- Strength and Wisdom - Topical study
- Strength and Temptation - Character study
- Strength to be Valiant - Word study
- Strength in Our Weakness - Verse study (focus on cross-references)
- Strength in the Battle - Chapter study
- Strength Serving Others - Character + topical study
- Strength and Gray Heads - Verse study (focus on original words)
- Strength in the Faith - Book study
It is recommended that you have Nave's Topical Bible and Strong's Exhaustive Concordance to completely benefit from the study. We don't own either of these books, so my son is using the recommended online tools on his Kindle Fire. He says they work great. Also, he told me he loves the app, Bible Minded, that the study suggested he download. This app helps with memorizing Scripture.
So how does one of these studies work? Well, let me show you . . .


On Day 2, my son looked up additional topics in Nave's, read Bible verses, and recorded his observations. Though not pictured, on Day 3 he organized his observations under provided topics, and on Day 4 he answered questions about how he could apply what he learned.
The individual studies don't follow the exact same format, but hopefully you have a general idea of how the book works.
Here's what my son had to say about Because You Are Strong:
"Because You Are Strong is a great Bible study for young teens. This book introduces many different methods of Bible study such as topical, meditation, character, and many more. Also, challenging questions are provided at the end of the assigned reading to make sure you are understanding everything you are studying. I think this study is really going to help me increase my knowledge of the Bible and grow closer to God. I believe this unique type of Bible study is fun, engaging, and inspiring for Christian teens."
So how does one of these studies work? Well, let me show you . . .

I am using Study 2 as an example here. Each study begins with the title, subtitle which tells which type of study it will be, and a Bible verse. Next, the topic of the study is introduced and briefly explained. After that, the study is divided into daily lessons, and your child can begin completing the assigned tasks.
As you can see, for Day 1 of Study 2, my son began by looking up "God - Omnipotent" in the Nave's Topical Bible (online resource) and recording Scripture references. He didn't have enough room to write his observations on this page.
Also, notice the gray boxes that appear on the right and left hand sides of the pages in both of the examples I have provided. These boxes give important information such as what the study is about, supplies needed, definitions of key words, online resources, ideas for further research, and much more. These boxes can be found on most of the pages throughout the study.

On Day 2, my son looked up additional topics in Nave's, read Bible verses, and recorded his observations. Though not pictured, on Day 3 he organized his observations under provided topics, and on Day 4 he answered questions about how he could apply what he learned.
The individual studies don't follow the exact same format, but hopefully you have a general idea of how the book works.
Here's what my son had to say about Because You Are Strong:
"Because You Are Strong is a great Bible study for young teens. This book introduces many different methods of Bible study such as topical, meditation, character, and many more. Also, challenging questions are provided at the end of the assigned reading to make sure you are understanding everything you are studying. I think this study is really going to help me increase my knowledge of the Bible and grow closer to God. I believe this unique type of Bible study is fun, engaging, and inspiring for Christian teens."
This study is available as a softcover for $14.00, or as an eBook (PDF) for $10.00. The page count for both books is 104.

Tuesday, August 20, 2013
W is for Windows: How to Clean Blinds
Pin It Now!
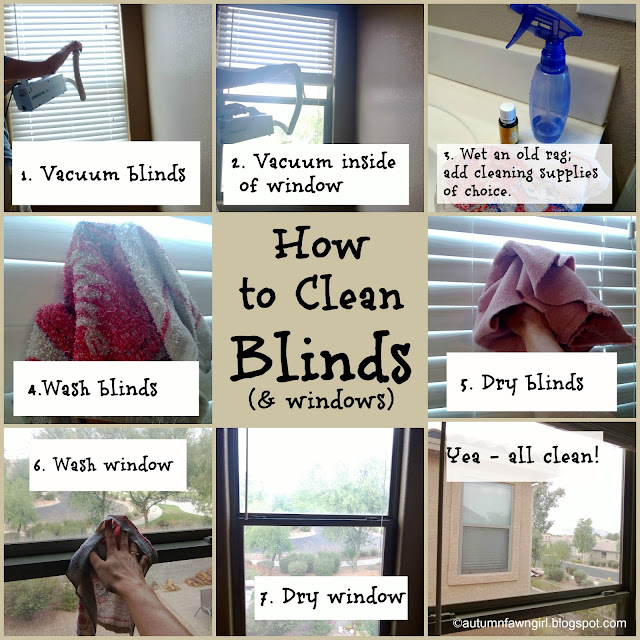
I am sure there is an easier way to do this, but this happens to be the way I have cleaned blinds every year for most of my marriage, and I've been married for 16 years. Wow.
Blind Cleaning Steps Explained
1. I vacuum blinds first to get rid of a lot of the dust that's collected. I vacuum each slat going across horizontally. Vacuuming keeps me from having to constantly wash out the cleaning rag. Plus, I can't stand the smell of wet dust - yuck!
2. After vacuuming blinds, I vacuum the inside of window and window ledge.
3. & 4.To clean the blinds, I wet an old rag and add essential oils to disinfect and to make the house smell wonderful! It takes some time, but I try to wash each slat going across horizontally. (I saw a neat tip the other day - wear an old sock when cleaning blinds. I will have to try that next time!)
5. I dry the blinds, too. I don't want streaks, and this extra step helps to make sure there's not a trace of dust left on the blinds.
6. & 7. Once the blinds are completely clean and dried, I wash and dry the window.
I clean one window at a time, and I usually spread out this chore over a couple of days. One regular sized window takes me about 10 minutes to clean from start to finish.
I thoroughly clean blinds once a year, but around Christmas time, I clean some of my windows and blinds again, especially the Christmas tree windows!!!
Cleaning blinds is not one of my favorite chores! How often do you clean your blinds, and how do you do it?
Linking to:
Works for Me Wednesday

I am sure there is an easier way to do this, but this happens to be the way I have cleaned blinds every year for most of my marriage, and I've been married for 16 years. Wow.
Blind Cleaning Steps Explained
1. I vacuum blinds first to get rid of a lot of the dust that's collected. I vacuum each slat going across horizontally. Vacuuming keeps me from having to constantly wash out the cleaning rag. Plus, I can't stand the smell of wet dust - yuck!
2. After vacuuming blinds, I vacuum the inside of window and window ledge.
3. & 4.To clean the blinds, I wet an old rag and add essential oils to disinfect and to make the house smell wonderful! It takes some time, but I try to wash each slat going across horizontally. (I saw a neat tip the other day - wear an old sock when cleaning blinds. I will have to try that next time!)
5. I dry the blinds, too. I don't want streaks, and this extra step helps to make sure there's not a trace of dust left on the blinds.
6. & 7. Once the blinds are completely clean and dried, I wash and dry the window.
-------------------------------------------------------------------------------------------------------
I clean one window at a time, and I usually spread out this chore over a couple of days. One regular sized window takes me about 10 minutes to clean from start to finish.
I thoroughly clean blinds once a year, but around Christmas time, I clean some of my windows and blinds again, especially the Christmas tree windows!!!
Cleaning blinds is not one of my favorite chores! How often do you clean your blinds, and how do you do it?
Linking to:
Works for Me Wednesday
Glazed Mint Brownies
Pin It Now!

This dessert recipe has been a summertime family favorite for years! If you like chocolate and mint, you'll love these brownies. :)
Glazed Mint Brownies
Ingredients:
Bake brownies according to directions in a 9x9 pan. In a mixing bowl, combine the filling ingredients; beat until smooth and creamy. Spread over cooled brownies. For glaze, melt chocolate chips and butter and stir until smooth. Spread carefully over filling. Refrigerate until filling and glaze are set. (A few hours at least.)

I cheat and use a boxed mix for this recipe. Baking brownies with chocolate chunks give extra yummy texture, and using coconut oil makes brownies taste so much better, too! These Glazed Mint Brownies have always been a great crowd pleaser. :)
*Linked to Try A New Recipe Tuesday

This dessert recipe has been a summertime family favorite for years! If you like chocolate and mint, you'll love these brownies. :)
Glazed Mint Brownies
Ingredients:
- Brownie Mix (or make your own healthier homemade batch to fit a 9x9 pan)
- 3 TBS butter, softened
- 1-1/2 cups powdered sugar
- 2 TBS milk
- 3/4 tsp. peppermint extract (I use a few drops of Young Living Peppermint essential oil)
- 3-4 drops green food coloring, optional. (I left it out of mine)
- 1 cup semisweet chocolate chips
- 4 TBS butter
Bake brownies according to directions in a 9x9 pan. In a mixing bowl, combine the filling ingredients; beat until smooth and creamy. Spread over cooled brownies. For glaze, melt chocolate chips and butter and stir until smooth. Spread carefully over filling. Refrigerate until filling and glaze are set. (A few hours at least.)

I cheat and use a boxed mix for this recipe. Baking brownies with chocolate chunks give extra yummy texture, and using coconut oil makes brownies taste so much better, too! These Glazed Mint Brownies have always been a great crowd pleaser. :)
*Linked to Try A New Recipe Tuesday
Friday, August 16, 2013
Hands of a Child: World Government {Schoolhouse Review}
Pin It Now!

 Once you have all of your supplies, you are ready to begin! The World Governments Note Pack follows this layout:
* Table of Contents
* Planning Guide
* Research Guide
* Graphic Templates
The Planning Guide contains the 5-day lesson plan for the note pack. It tells you what to read and which assignments to complete on specific days. Immediately following the planning guide is a related reading list, a bibliography, and an Activities and Instructions page. There are 15 activities (plus 2 extension activities) in this note pack. Each activity has a corresponding graphic template that can be found after the Research Guide.
The Research Guide contains all of the lessons that are to be read before completing the activities. It's laid out in a chapter-like format, and included at the end of the eight-page guide is a list of vocabulary words to learn during the study.
So, what did my son learn by completing the World Governments Note Pack during his very first week of high school in history class? I am so glad you asked! Here's a taste of what he learned about:
Most of the activities comprised worksheets in which information from the lessons needed to be recorded in the appropriate graphic templates. Some of the templates asked for my son's opinion. For example, he was asked to write about a governmental power with which he agreed and one with which he didn't agree. Also, he was asked to write a report answering the following question: "If you were to establish your own country, what type of government would you have and why. In these types of assignments, children really have to demonstrate how well they understand what they've learned.

The last assignment was kind of fun. My son had to think up an international organization that he'd like to create, and he had to describe its purpose and goals, give it a name, and design a logo. Being a little on the silly side, he came up with the National Association of Nerds and Geeks. :) Here's the logo he designed using Pic Monkey:

My son's opinion of the World Government Note Pack: He said it was easy work - most of the work was just copying from the lesson except for a few further research assignments. He also said that though it was informative, it wasn't hard core or anything - just learned the basics of government. One minor thing he didn't like was the layout. Flipping back and forth between sections was a bit bothersome.
*Really, my son's last point was a very minor issue. It might have been a little less bothersome if after each lesson the corresponding activity and graphic template immediately followed.
Hands of a Child World Governments Note Pack is a great unit study for learning the basics of world governments. For children in upper high school grades, it would probably be very beneficial to delve deeper by reading some or all of the suggested related reading. It's also flexible but can easily be completed in 5 days according to the schedule. The regular price for this Note Pack is $12.00, but it is currently on sale for $5.00. Don't miss this great deal - check them out today!

In the Hands of a Child sent Schoolhouse Review Crew members an assortment of Lapbooks and Note Packs to review. Our family received the World Governments Note Pack appropriate for children in grades 8-12.
Hands of a Child strives to provide hands-on learning for all ages that's educational and fun. This company offers a wide variety of Lapbooks and Note Packs covering many different subjects such as history, science, math, Bible, geography, holiday, just for fun, and more.
My 9th grade son chose a Note Pack instead of a Lapbook, so before I jump into the World Governments Note Pack review, let me tell you a little about Note Packs and notebooking. If you are not familiar with this style of learning, I hope this information proves helpful.
Hands of a Child Note Packs make excellent stand-alone unit studies or can be used as a supplement to an existing curriculum. They follow the model of Notebooking which is basically another way of saying educational journaling. With Notebooking, a student records information he's learned in a notebook or binder. The student then fills his notebook with pages that can include copywork, drawings, maps, narrations, reports, timelines, and more. Notebooking is like lapbooking without all of the cutting and pasting!
Notebooking can help students improve their comprehension, listening, narrating, artistic and organization skills. Students also have the opportunity to express themselves in a creative way and can easily show off their work once a notebook is completed. A finished notebook equals an instant scrapbook!
All Hands of a Child Note Packs contain all of the information, activities, and graphic templates needed to complete a notebook. They also include a Research Guide, Activity Questions, and Notebooking Pages.
Supplies needed for notebooking are rather simple - white or colored copy paper, notebook or binder, and writing and coloring tools.

* Table of Contents
* Planning Guide
* Research Guide
* Graphic Templates
The Planning Guide contains the 5-day lesson plan for the note pack. It tells you what to read and which assignments to complete on specific days. Immediately following the planning guide is a related reading list, a bibliography, and an Activities and Instructions page. There are 15 activities (plus 2 extension activities) in this note pack. Each activity has a corresponding graphic template that can be found after the Research Guide.
The Research Guide contains all of the lessons that are to be read before completing the activities. It's laid out in a chapter-like format, and included at the end of the eight-page guide is a list of vocabulary words to learn during the study.
So, what did my son learn by completing the World Governments Note Pack during his very first week of high school in history class? I am so glad you asked! Here's a taste of what he learned about:
- Roles of Government
- Powers of Government
- Limited and Unlimited Government
- Types of Government
- Forms of Democracy
- Famous Dictators
- Types of Republics
- Governments Based on Economics
- Types of Monarchies
- International Organizations
- Anarchy
- Arbitrator
- Compensation
- Democracy
- Dictatorship
- Draft
- Emir
- Federation
- Government
- Hierarchy
- Immigration
- Monarch
- Monarchy
- Political
- Republic
- Sovereign
- Tax
- Theocracy
Most of the activities comprised worksheets in which information from the lessons needed to be recorded in the appropriate graphic templates. Some of the templates asked for my son's opinion. For example, he was asked to write about a governmental power with which he agreed and one with which he didn't agree. Also, he was asked to write a report answering the following question: "If you were to establish your own country, what type of government would you have and why. In these types of assignments, children really have to demonstrate how well they understand what they've learned.

The last assignment was kind of fun. My son had to think up an international organization that he'd like to create, and he had to describe its purpose and goals, give it a name, and design a logo. Being a little on the silly side, he came up with the National Association of Nerds and Geeks. :) Here's the logo he designed using Pic Monkey:

My son's opinion of the World Government Note Pack: He said it was easy work - most of the work was just copying from the lesson except for a few further research assignments. He also said that though it was informative, it wasn't hard core or anything - just learned the basics of government. One minor thing he didn't like was the layout. Flipping back and forth between sections was a bit bothersome.
*Really, my son's last point was a very minor issue. It might have been a little less bothersome if after each lesson the corresponding activity and graphic template immediately followed.
Hands of a Child World Governments Note Pack is a great unit study for learning the basics of world governments. For children in upper high school grades, it would probably be very beneficial to delve deeper by reading some or all of the suggested related reading. It's also flexible but can easily be completed in 5 days according to the schedule. The regular price for this Note Pack is $12.00, but it is currently on sale for $5.00. Don't miss this great deal - check them out today!
Thursday, August 15, 2013
Mullin's 14th Birthday Celebration
Pin It Now!

I SERIOUSLY cannot believe that I have a 14-year-old. It doesn't seem so long ago that I was beginning my freshman year at Collierville High. I honestly have to say that I am very blessed to have my son at home during these last few years of his life as a child. My brain knows that in 4 years, my son will be an adult, but my heart says, "Eh, eh - no way!" Okay, I don't want this post to turn into a mama rant, so without further adieu, I present Mullin, my 14-year-old!!!


I SERIOUSLY cannot believe that I have a 14-year-old. It doesn't seem so long ago that I was beginning my freshman year at Collierville High. I honestly have to say that I am very blessed to have my son at home during these last few years of his life as a child. My brain knows that in 4 years, my son will be an adult, but my heart says, "Eh, eh - no way!" Okay, I don't want this post to turn into a mama rant, so without further adieu, I present Mullin, my 14-year-old!!!

He chose a simple, family celebration and $ instead of a party with friends. :) Birthday Menu: Taco Ring, Orange Dreamsicle Birthday Punch, and Oreo Delight (of course).

At his request, I made Taco Ring in the shape of a 14. We usually only eat this meal on Valentine's Day. For the 14, I had to use 3 tubes of crescent rolls, and I also doubled the filling part of the recipe.

And for dessert, Oreo Delight, his favorite choice!! This year we did something a little different and used the chocolate Oreos instead of the regular ones. DELICIOUS, and most of us think it tastes better!
So proud of this guy and the man he is becoming! Love you, Mullin.
Wednesday, August 14, 2013
Come Thou Fount of Every Blessing
Pin It Now!
Growing up in the South, my hubby and I were both brought up in the church singing hymns. I can remember what it was like to sit through a church service in traditional pews that had real hymnals secured to the to the back of the pew in front of me. I can hear the pastor asking his flock to open their hymnals to page such and such, and I can almost smell the well-worn pages within. :)
(Closing my eyes) Mmmm, nostalgia!
Every so often, my guitar-playing, worship-leading husband leads our pretty non-traditional congregation in a hymn . . .
Come Thou Fount of Every Blessing by Robert Robinson - One of my hubby's favorite hymns. Here's his rendition:
To learn about the interesting life of Robert Robinson click the link. :)
For lyrics and details surrounding this hymn that Robert wrote at the tender age of 22, click the link. :)
To learn more about my hubby, visit www.ragamuffinwriter.com. :)
Tuesday, August 13, 2013
Orange Dreamsicle Birthday Punch
Pin It Now!
 Orange Dreamsicle Birthday Punch
Ingredients
Combine Hawaiian Punch and Orange Fanta in a large punch bowl. Add ice cream/sherbet immediately before serving.
*To make ice cream shapes, spread softened ice cream onto baking pan lined with foil. Refreeze ice cream. Press down sturdy cookie cutters and cut through the ice cream. If too difficult to remove shapes at this time, refreeze ice cream again. When thoroughly frozen, try to carefully remove shapes from the surrounding ice cream. There may be an easier, less messy way to do this, but it worked for me. ;) If you have tips in this area, please share!!


Ingredients
- 64 oz. Orange Hawaiian Punch
- 2 liter of Orange Fanta
- Kroger Orange Scream Deluxe Ice cream/sherbet
Combine Hawaiian Punch and Orange Fanta in a large punch bowl. Add ice cream/sherbet immediately before serving.
*To make ice cream shapes, spread softened ice cream onto baking pan lined with foil. Refreeze ice cream. Press down sturdy cookie cutters and cut through the ice cream. If too difficult to remove shapes at this time, refreeze ice cream again. When thoroughly frozen, try to carefully remove shapes from the surrounding ice cream. There may be an easier, less messy way to do this, but it worked for me. ;) If you have tips in this area, please share!!


For another fun punch recipe, click this link: Perfect Punch for Baby Boy Shower.
Linked to Try A New Recipe Tuesday, Works for Me Wednesday
Sunday, August 11, 2013
V is for Valor - The Kind that Smells Good!
Pin It Now!

Getting closer and closer to Z! This week I am talking about VALOR.
When you see the word VALOR, you probably think courage, fearlessness, gallantry, bravery, and the like.
When I think of VALOR, I think of the all natural essential oil blend that I use as perfume. :)
I gave up wearing synthetic perfume years ago, and instead choose to wear essential oils that are actually beneficial to the body. Most perfumes bother my nose and lungs anyway. In highschool I remember wearing a fragrance called Pear Glace (I think) sometimes, and every time I wore it, I'd get a sore, scratchy throat. It took me a while to finally put two and two together.
My favorite essential oil to wear as perfume is Valor, but if I have plain frankincense, I like to wear that, too. Frankincense just costs a lot more, and so far, I've only been fortunate enough to own one tiny bottle. Lavender, peppermint, tangerine, etc. are great to wear, too. :) But Valor is my FAVORITE!
Valor essential oil blend ingredients: Spruce, Rosewood, Blue Tansy, Frankincense, and Almond Oil.
Maybe that's why I love it so much - it contains frankincense! Valor is a pretty oil, too - indigo, I'd say.
While I mostly use Valor as a perfume, I have used it for back pain, too. I've rubbed it into my shoulders and temples to relieve stress; it really does have a calming effect.
I believe with all my heart that essential oils can have wonderful benefits that go beyond the physical (I've used them for many, many years for all kinds of things), however, I don't get too into the so called "spiritual" side of oils. For me, that's pushing their benefits a little too far. I definitely don't want to give an oil more credit than it deserves. The One who made the plants, flowers, etc. from which we get the oils should get the credit! Anyway, I am not going to really get into that discussion now, but I wanted to mention it in case any of the links I provide get a little wacky. ;)
Others have already written about all of the benefits and properties of this oil, I figured I'd link to their sites here. There's some really good info in these posts.
http://www.herbal-treatment-remedies.com/valor-essential-oil.html
http://aromatherapy4u.wordpress.com/2008/07/06/valor-essential-oil-roll-on/
http://younglivingoillady.com/home/valor-essential-oil/
http://www.experience-essential-oils.com/valor-essential-oil.html
Be sure to visit Ben and Me for more V posts!
Friday, August 09, 2013
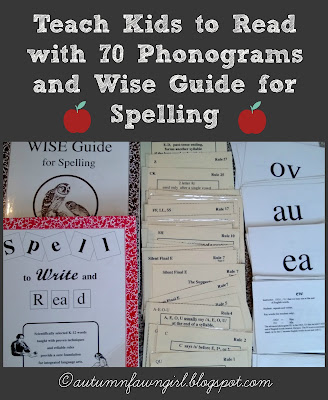
5 Days of Teaching Kids to Read: Phonograms & Spell to Write and Read
Pin It Now!
Welcome to Day 5 of Teaching Kids to Read!

I really hope this series has been helpful. Feel free to ask any questions! If you missed any of the other articles in this series, you can see them by clicking the following links:
Also, don't forget to check out the rest of the articles from the Schoolhouse Review Crew!
{affiliate links included}
Welcome to Day 5 of Teaching Kids to Read!

I didn't start formal spelling until my kids were in first grade even though they could all read pretty well by then. Again, at least in my experience, I found that learning to read came much more easily than learning to spell.
When my firstborn son started first grade I began the program Spell to Write and Read (SWR). I know it sounds confusing that I'd choose this spelling curriculum when my child could already read, huh? I will do my best to explain. (And I will also explain why I am including this in my teaching kids to read series, so stick with me!)

Phonics was extremely important to me as I was teaching my child to read, so I wanted a spelling program that taught children how to spell phonetically. In my research and conversations with some homeschooling friends, I ended up settling on Spell to Write and Read by Wanda Sanseri.
I liked the approach that a word is spelled a certain way for a reason, and with SWR, very few "exception-to-the-rule" words or "sight words" are taught. The English language, just like any other language, does have a few exceptions, but not as many as you may think or have been taught to think. I certainly remember learning all those "exceptions" don't you?
I also love that I can tell my children exactly why a word has a silent e or why we drop the e in the word changing but not in changeable. I love that I can tell them exactly why we use the phonogram ai in the middle of a word and why we use ay at the end of a word. And the list goes on and on. If you want more from a spelling curriculum than just mindless lists that have to be memorized, you might want to give SWR some serious consideration.
Spell to Write and Read is basically the Teacher's Manual designed to accompany Wise Guide for Spelling which contains organized spelling lessons. You need both books to effectively use the program. SWR explains how to teach all of the spelling rules and guides you through some of the assignments that are given in Wise Guide.
Besides spelling, this program covers penmanship, reading, composition, dictionary skills, and grammar. It also "paves the foundation for improving comprehension and building vocabulary. It clarifies our spelling dictation techniques and explains in depth the "thinking to spell" process.
Now, I will say this: SWR is an intense spelling program. It was a lot to absorb and process at first. I spent many days reading and figuring it out before actually starting. This is a program that you do with your kids, so it does take up your time. Once I jumped in and started the lessons, it all fell into place. I established a routine and made it work for us. I didn't always do ALL of the assignments for each lesson, and I often spent 2 weeks on one lesson instead of 1 week. It takes work, but it's also very flexible.
I am glad I stuck with it! I feel it really is a quality spelling program. I am still right in the middle of it with my last child, and my sixth grader is almost finished. Yea!
I recommend purchasing the entire kit all at once even though it costs around $100.00.
Why? Because this program can be used for about 4-6 years depending on how quickly you and your child move through the lessons. This program is a go-at-your-own-pace program. No pressure to advance to the next lesson until your child is ready. So, when you think about it, that's like only spending about $20/year on spelling. Since I have used it with all 3 of my kids, the price has been well worth it!!
The entire kit includes:
- Spell to Write and Read Book
- Wise Guide for Spelling Book
- 70 Basic Phonogram Cards
- 28 Spelling Rule Cards
- Phonogram CD
Why I Included Spell to Write and Read in This Series
It is intended to be used to teach kids to read, but for me, it's mostly because of the handy dandy phonogram cards. With my second and third children, I was able to use these cards right along with Happy Phonics. The phonogram cards include all of the single letters of the alphabet, 2-letter phonograms, and 3 or more letter phonograms. The front of the cards shows the phonogram and the back explains the sounds, gives examples of words, and gives further instruction if necessary. I LOVE these cards!
Also, there are 11 steps in SWR that you can follow before you begin the regular spelling lessons in Wise Guide for Spelling. So, if you plan to use this program, you may want to get it before first grade. You can use this program exclusively to teach your kids to read, but since I already had Happy Phonics, I used both.
While I really like this program, I kind of did it backwards. I liked teaching my kids to read before they could spell. Just my preference, but obviously the intended purpose of this particular program is to teach your kids to spell to write and read.
- All About Learning the Alphabet
- Happy Phonics
- Phonics Resources that Incorporate Writing
- Reading Resources
Also, don't forget to check out the rest of the articles from the Schoolhouse Review Crew!
Thursday, August 08, 2013
5 Days of Teaching Kids to Read: Reading Resources
Pin It Now!
Welcome to Day 4 of Teaching Kids to Read!


4. Use the Internet
When I first began homeschooling, I don't remember using the Internet very much. How I lived without it, I will NEVER know!!! Thank goodness for the Internet, right?! Following are a few websites to get you started:
Free Easy Readers for Elementary Children
Online Storybooks
Free Printable Booklets
List of Online Reading Games
5. Beyond the Code

The Beyond the Code series (4 books) follows Explode the Code, the series I mentioned yesterday. Beyond the Code focuses on Comprehension and Reasoning skills. Your child will read stories and complete comprehension activities like answering yes/no questions, writing answers to comprehension questions, and more.
My children used these books in second grade. It was easy for them to progress to these books since they were already familiar with the style and format of Explode the Code. Usually they were able to do these workbooks on their own, but sometimes I helped them write complete sentences and spell words correctly when needed.
These workbooks are pretty affordable and can be purchased on Amazon.
Click the banner to read more articles from Schoolhouse Review Crew Members!
Welcome to Day 4 of Teaching Kids to Read!

1. Use the Library
I didn't have enough money to buy tons of easy readers, so I made lots of trips to the library. Our library has a specific easy reader section, so I am assuming that they all do. Sometimes it was difficult to find books that fit the exact needs of my kids, but we worked with what was available. I really tried to get books that reflected what sounds we were learning, however, sometimes I would get books that were slightly below my kids' reading levels to boost confidence. I didn't want reading to always be such a challenging task. We could practice fluency with easier books, too. To me, it wasn't only important what they read but how they read.
2. Make Up Your Own Sentences
I often made up my own sentences for my children to read as they learned new sounds and blends. I did this for three reasons: (1) It was FREE, (2) I could tailor the sentences to meet the specific reading needs of my kids, and (3) there weren't enough books at the library for each new reading level my kids achieved, and I wanted them to practice reading every day.

As my kids' learned new phonograms, I made up sentences using words that contained those specific phonograms. It could be challenging at times to make sure all of the other words in the sentences were words that they could already read!

Sometimes I made up a list of random sentences and had them read a few each day. After each sentence was read without any mistakes, I highlighted it in yellow. These are only a few samples of all the sentences I wrote. It took time, but it was free and tailored to my kids' needs.
3. Bob Books
When my second child was ready to start reading simple sentences, I splurged and bought the Bob Books Beginning Reader set. I justified my purchase since I didn't have to buy another phonics curriculum. :) I liked that the Bob Books were simple and progressed in a certain order. I had him read a book until it was mastered, and then we'd move on to the next book.

My daughter (3rd child) also liked reading Bob Books. Here she is about 3 years ago reading to all of her dolls.
Bob Books are available on Amazon . . .
4. Use the Internet
When I first began homeschooling, I don't remember using the Internet very much. How I lived without it, I will NEVER know!!! Thank goodness for the Internet, right?! Following are a few websites to get you started:
Free Easy Readers for Elementary Children
Online Storybooks
Free Printable Booklets
List of Online Reading Games
5. Beyond the Code
The Beyond the Code series (4 books) follows Explode the Code, the series I mentioned yesterday. Beyond the Code focuses on Comprehension and Reasoning skills. Your child will read stories and complete comprehension activities like answering yes/no questions, writing answers to comprehension questions, and more.
My children used these books in second grade. It was easy for them to progress to these books since they were already familiar with the style and format of Explode the Code. Usually they were able to do these workbooks on their own, but sometimes I helped them write complete sentences and spell words correctly when needed.
These workbooks are pretty affordable and can be purchased on Amazon.
Click the banner to read more articles from Schoolhouse Review Crew Members!
*Affiliate links included in this post.
Wednesday, August 07, 2013
5 Days of Teaching Kids to Read: Phonics Resources That Incoroporate Writing
Pin It Now!
Welcome to Day 3 of Teaching Kids to Read!


j(vHBMD6BnZVsg~~_35.JPG)


The entire set is available on Amazon. I don't believe answer keys are included, so those will have to be ordered separately.
Welcome to Day 3 of Teaching Kids to Read!
Three phonics resources I used to incorporate writing:
- Tablet Paper
- Explode the Code
- First-School (mentioned in my first post)

Tablet Paper
When I first started teaching my children to read, they really weren't old enough to write yet, so we focused on coloring pages, etc. When I felt that they'd developed enough fine motor skills to be able to hold a pencil and make legible marks on a piece of paper, I bought some inexpensive, age-appropriate Tablet Paper from the store and had my kids trace letters/words that I'd written with a yellow highlighter.
While my kids were continuing to practice phonics, they were also learning how to write. I started with the alphabet going in order from A-Z, and I also included a couple of words at the bottom of the paper that I knew they could already read.

Once they finished the alphabet, we moved on to phonograms (two or more letters that make one sound). At the bottom of the paper, I included short sentences which featured words with that particular phonogram and other words that I knew they could already read.

I used Happy Phonics (which I mentioned in the previous post), and I used 70 phonograms from Wise Guide for Spelling (which I will explain in Friday's post) in order to cover all of the letter blends on the tablet paper.
Explode the Code
Explode the Code is a workbook series that I used in conjunction with Happy Phonics. Individually, the workbooks are pretty affordable, so sometimes I would only order a couple at a time if I couldn't afford to get them all. There is a Primer Set that precedes Explode the Code Books 1-8, however, we never used those. My kids also never used the 1/2 Books that come in-between each book. It is my understanding that the 1/2 books offer extra practice if needed.
Following is a brief explanation of what is covered in each book:
- Book 1: short vowels
- Book 2: initial and final consonant blends
- Book 3: long vowels, silent e, digraphs
- Book 4: compound words, endings, syllabication
- Book 5: word families, 3-letter blends
- Book 6: r controlled vowels, silent letters, vowel diphthongs
- Book 7: soft sounds of c and g, silent consonant patterns, and more
- Book 8: suffixes, irregular endings
My children went through Books 1-4 in Kindergarten, and Books 5-8 in first grade. Because my children learned to read much faster than they could write and spell, I would tailor some of the tests at the end of each book according to their needs. I remember Book 4 being the most difficult for all 3 of my kids to get through. While my kids could do these books on their own most of the time, I helped whenever they needed me to. Sometimes we would do lessons together, especially in Book 4.
Overall, I really liked Explode the Code, and I loved that once my kids could read fairly well they had workbooks they could do all by themselves!

This is the only Explode the Code Book that I could find that I saved. At least 2 of my kids started this book at the beginning of first grade.
The entire set is available on Amazon. I don't believe answer keys are included, so those will have to be ordered separately.
First-School
I mentioned this free website in my first post in this series, All About Learning the Alphabet. My kids colored letters and pasted pictures before they began writing. Well, I also used this website to print Handwriting Worksheets. Again, everything is free, and there are a lot of different types of worksheets from which to choose. I highly recommend that you check out this website if you haven't already.
*Click the banner below to read more articles from the Schoolhouse Review Crew on a variety of subjects.
*Affiliate link included in this post.
Tuesday, August 06, 2013
5 Days of Teaching Kids to Read: Happy Phonics
Pin It Now!
Welcome to Day 2 of Teaching Kids to read!
.jpg)

Tomorrow, I will be sharing about some other resources I used during the phonics stage that incorporated writing. Be sure to check out lots of other great articles from members of the Schoolhouse Review Crew! Just click the banner below.
Welcome to Day 2 of Teaching Kids to read!
.jpg)
Today I am going to talk about delving deeper into the wonderful world of PHONICS. While I taught my first child the basics of learning letters with the items mentioned in my previous post, I found it much easier to progress further with some type of program. I was so happy when I came across the inexpensive Happy Phonics curriculum! A decade ago, I think I bought it for $50, but it looks like it now sells for about $60. It's a GREAT phonics program and all of my kids loved it!
Whether your kids already know their letters and sounds or whether they are ready to begin blending sounds, I highly recommend Happy Phonics since it worked so well for our family! My children mostly used this program during pre-school/Kindergarten.

Happy Phonics by Diane Hopkins is a simple, fun method of teaching reading primarily through the use of games. Phonics sounds are introduced a few at a time followed by games to help reinforce what's been taught. It's a program designed for you and your child to be able to move along at your own pace. I now see that it is included as one of Cathy Duffy's 100 Top Picks for homeschool curriculum!
My Happy Phonics kit contained the following items:
- Happy Phonics Guidebook
- 25 Cardstock Games
- Flip and Read Booklets
- 7 First Books
- Read and Spell Lists
- Flashcards
- 76-page Beginner Reader, My Big Book
- And More!
I did have to cut out and assemble the cardstock games 10 years ago, but I don't know if you still have to do that or not. It wasn't really that big of a deal, especially since I thought I was getting it for a decent price.
Diane includes 8 detailed steps to teach children to read fluently, which I found easy to follow.
- Step 1: Teach your child to sing the alphabet song.
- Step 2: Teach that capital letters match the lowercase letters.
- Step 3: Teach a sound for each alphabet letter. (She recommends teaching one sound at a time, but I didn't do it that way with my second and third children. I will explain in another post in this series.)
- Step 4: Blend letter sounds to form a word.
- Step 5: Teach common non-phonetic words.
- Step 6: Teach that vowels can make a second sound.
- Step 7: Teach phonics units containing two or more letters.
- Step 8: Reading Everything!
For each step, she tells you exactly which games and other accessories to use. Some of our favorite games to play together were:
- Muffin Match
- Castle Game
- Climb the E Tree
- Boat Launch
- Space Race
- Bingo
The best part of playing these games, besides seeing how much fun my kids were having, was using CANDY as pawns!! My kids loved being able to eat their pawns as soon as the game was finished. M&Ms, Skittles, Smarties, Jellybeans, etc. make great pawns. My kids were always excited when we played Bingo because they got to eat more than one piece of candy at a time. :)
Teaching my kids to read with Happy Phonics really did make it fun. I have sweet memories of sitting around the kitchen table playing games with my kids and spreading out Muffin Match cards and sentence cards all over the living room floor. I still have my kit and would be completely willing to sell, but I don't think it is in good enough condition since I used it over and over again with all 3 of my kids. It is available on Amazon, though!
Tomorrow, I will be sharing about some other resources I used during the phonics stage that incorporated writing. Be sure to check out lots of other great articles from members of the Schoolhouse Review Crew! Just click the banner below.
*Affiliate link included in this post.
Subscribe to:
Posts (Atom)