Showing posts with label Science Experiments. Show all posts

Monday, November 04, 2013

Apologia - Exploring Creation with Chemistry and Physics {Schoolhouse Crew Review}

Pin It Now!

Science has been quite an enjoyable experience for me as a homeschool mom thanks to Apologia Educational Ministries. I've used a few other science products here and there, but Apologia has always been the backbone of our science curriculum. I have truly enjoyed learning all about God's amazing world alongside my children. I was very excited when Schoolhouse Review Crew members were given the chance to review their Exploring Creation with Chemistry and Physics curriculum. My daughter and I received the Exploring Creation with Chemistry and Physics physical book and the Exploring Creation with Chemistry and Physics Junior Notebooking Journal.


Apologia Mission

Do you know what the word Apologia means? It's a Classical Greek word that is used in the New Testament eight times and is associated with someone defending his faith, beliefs, or actions by reason and logic. Apologia Ministries is a family-owned corporation that provides families with Biblically sound educational materials and curriculum (science, history, language arts, Bible) to equip them to defend the Christian faith according to 1 Peter 3:15.

Apologia in Our Homeschool

Our family has gone through every single one of the Apologia science books up to ninth grade. (Their creation based science curriculum is K-12.) Presently, my sixth grade son is using Exploring Creation with Zoology 1: Flying Creatures of the Fifth Day, and my ninth grade son using Exploring Creation with Biology. My third grade daughter and I started off the school year tackling Exploring Creation with Human Anatomy and Physiology, but I figured it would be well worth it to interrupt our studies to review the one Apologia book that we've never used. So, as you can see I am a huge Apologia fan!

*A note on book order: Really, the elementary science books do not have to be done in any particular order, however, Astronomy, Botany, and Zoology 1 and 2 are more easily understood by younger students. I have personally found that doing Zoology 1, 2, and 3 in numerical order works best for us. With all of the elementary books, there is always information that seems to go over my younger kids' heads, but I don't worry too much. I know they will get the information in greater depth in the junior high curriculum and high school curriculum. Flexibility is key to making this quality, God honoring, academically sound curriculum successful in your homeschool!

Exploring Creation with Chemistry and Physics Textbook

Exploring Creation with Chemistry and Physics is part of the Young Explorers Series in Apologia's elementary science curriculum written by Jeannie Fulbright for students in grades K-6. This homeschool science curriculum follows the Charlotte Mason approach to learning and provides an excellent introduction to the marvels of God's creation regarding the wonderful world of chemistry and physics. The text, written directly to the student, reads more like a conversation which makes learning more fun and memorable. There are plenty of pictures and illustrations, hands-on-experiments, and other activities to keep kids interested, too.

This full-color, hardback volume contains 14 lessons that can be broken up into manageable time slots according to your own schedule, ages of children, and specific needs. The Exploring Creation with Chemistry and Physics Junior Notebooking Journal, designed to accompany the textbook, includes a detailed, suggested 2-week schedule for each lesson. I personally go a little slower with younger children and try to stretch lessons out to 2 1/2 weeks with some lessons taking less time or even more time to finish. Also, I don't stress over doing every single project throughout each lesson, especially with this book as it seems to have more than the other books.

Basically, you can go at your own pace with this curriculum. Take the immersion approach and spend an entire year on one book, or go through them faster so you and your children can complete all 7 of the elementary books before they are ready to start the junior high curriculum. So far, we've always spent the entire year on one book. Sometimes we finish before the year is up which is great because I give my kids the freedom to choose something they would like to learn about for the rest of the year.

Lessons included in this course are as follows:
  • Chemistry and Physics Matter
  • Moving Matter
  • Building Blocks of Creation
  • Compound Matter
  • Multitude of Mixtures
  • Mechanics in Motion
  • Dynamics of Motion
  • Work in the World
  • Sound of Energy
  • Light of the World
  • Thermal Energy
  • Electrifying Our World
  • Mysterious Magnetism
  • Simple Machines
Jeannie Fulbright includes several Try This! hands-on-experiments in each lesson to help children understand the concepts she is teaching. Throughout each lesson, children are also asked to narrate what they've learned to help them retain information and learn to communicate clearly and effectively. At the end of each lesson there are What Do You Remember? questions, notebooking activities, and a final project. All of these activities can be completed without the accompanying notebooking journal, however, it is a very convenient addition to the curriculum which I will address in just a minute. Before I move on, I want to mention a few more features of the Exploring Creation with Chemistry and Physics textbook.

The textbook includes a wonderful introduction that tells you everything you need to know in order to effectively complete the course. It provides a step-by-step guide on how to use the book and gives course website information if you want to dig deeper. At the end of the book, you will find a complete supply list for everything you will need to complete the Try This! activities, experiments, and projects for each lesson. Most materials are household items or things that can be purchased easily at the store. Finally, there is an answer key to all of the What Do You Remember? questions and any questions asked throughout the text.


Though we didn't do all of the Try This! experiments, we did do quite a few. Here are some from Lesson 1: Chemistry and Physics Matter. My daughter is demonstrating volume and displacement, density, and buoyancy in the following activities. My middle son even got in on one of the projects in which we had to make boats out of aluminum foil and see how many pennies they could each hold. My daughter was so excited that her boat held the most. :)


More Try This! experiments: here my daughter is learning about one of the properties of metals - magnetism. A simple project, yet she was quite fascinated.


At the end of each lesson, there is always a final project, and she couldn't wait for this one - making lava lamps. Even though she'd done a project like this before, she wanted to do it again because it is so fun.


During the review period, we were able to start Lesson 2: Moving Matter, but we haven't finished it yet. In this chapter, we are learning all about solids, liquids, and gasses. Here are a few Try This! experiments we've done so far: discovering which types of liquids will freeze the fastest, observing expanding gas putting pressure against the sides of a balloon, and learning that air takes up space and actually kept a piece of paper from getting wet even though the cup was submerged in water. Cool stuff!


Exploring Creation with Chemistry and Physics Junior Notebooking Journal

The junior notebooking journal is designed to accompany the textbook and is great for younger elementary students or for those with limited writing skills. You will find coloring pages, lined pages for recording fascinating facts, Bible verse copywork in print or cursive, additional projects and book suggestions, lined pages for recording all of the experiments your child completed, crossword puzzles and word searches, and full-color, cut-and-fold mini books to assemble. Field trip sheets are provided at the back of the notebook to record information if you choose to visit museums, etc.


As I mentioned earlier, the notebook includes a suggested schedule of completing one lesson every 2 weeks. Their schedule also suggests doing science 2 days per week, however, it is entirely up to you how you plan your schedule. There is much room for flexibility, in fact, we do science every day. To me, it is much easier to divide the lessons into really small chunks for younger children. Actually, I think it's better for me that way, too. :)


While the notebook is very handy, you can use the Apologia elementary science curriculum without it. In fact, I have used an Apologia notebook only one other time. Having a very tight homeschool budget, we usually make our own science 3-ring binders for recording notes, answering questions, and tracking projects. My sixth grade son even prefers this method since he doesn't like all of the extra "busy work" in the Apologia notebooks. I think the Exploring Creation with Chemistry and Physics Junior Notebooking Journal is working well for my daughter, though, since she doesn't like to write very much and even struggles a little in this area. On some days I substitute coloring pages or crossword puzzles for note-taking. That keeps her from becoming overwhelmed with too much writing.

Opinion

I honestly didn't think learning about chemistry and physics could be so interesting. I remember hating chemistry when I had to take it in high school, but Jeannie Fulbright has a gift for bringing science to life, making it fun and interesting, and glorifying God in the process. Truly, after I read any of her science books, I can't help but be in awe and want to praise the Maker of heaven and earth!

I know my daughter has really enjoyed doing so many experiments. In this book, a lot of them are pretty quick and easy to do, so we've been able to do more than usual. When I asked her if she wanted to go back to anatomy and physiology after the review period, she said, "No!" She really likes learning about chemistry and physics which surprised me. In a good way, though. :) So, we will continue with Exploring Creation with Chemistry and Physics this year and resume anatomy next year which happens to be my favorite.

Cost

The 280-page Exploring Creation with Chemistry and Physics textbook is $39.00, and the 237-page Exploring Creation with Chemistry and Physics Junior Notebooking Journal is $24.00. Both are available on the website.

I highly recommend Apologia! Be sure to read more crew reviews by clicking the banner below.

Photobucket
 
 
 photo Disclaimer2_zpsff718028.gif

Monday, February 27, 2012

Delicious Moon Phases

Pin It Now!

My daughter and I have been learning all about astronomy this year, and thanks to pinterest, I saw the Oreo Moon Phase project just in time!

Seeing the above project spurred me on to look up "Oreo Moon Phases" on the web, and there were so many cute ideas. I decided to have my daughter draw the earth in the center of a paper plate and put the cookie moons around it. I saw one project in which a cupcake with blue frosting was used as the earth~yummy. :)


First, she made a Moon-Go-Round from What on Earth?


Then, the fun project she'd been waiting for . . . Oreo Moon Phases. After drawing her earth, she "glued" the 8 Oreo moons to the plate with frosting. I helped "make" the different phases by scraping off the white filling with a knife. She glued one of her moons backwards, but I think she got the point. I am sure this will be a project she will never forget!

She also used her sun (also a project from What on Earth?) for the photo. :)


I'd say these were the best tasting moons ever.

This tasty astronomy project worked for us!!  Linked to Works for Me Wednesday.

Sunday, February 26, 2012

My Own Microwave Test

Pin It Now! I received an email from a friend asking about my thoughts on microwave use and attached in the email was a science fair project involving plants and microwaves done by a child in secondary school. I found a link of the project here.

In the science fair project, a girl watered one plant with cooled water that had been boiled on a stove and the other plant with cooled water that had been boiled in the microwave. She showed that the plant that had been watered with microwaved water died within 9 days. Click the above link to view her project in full and to also read a FORENSIC RESEARCH DOCUMENT
Prepared By: William P. Kopp. I have never heard of this guy, but he writes about the health hazards of microwave use.

What does this have to do with me? Well, it peaked my interest since I am one of those people who think microwave use probably isn't all that good for you. I have always limited its use; I even went years of my marriage without even owning one. The only reason I have one now is because it came with the house. Of course, I have to admit that I do use it occasionally--it is pretty convenient every now and then!

I figured, since I am a stay-at-home-homeschool mom, that this would be a simple project for me to do.

What I did: I bought some cheap viola flower plants from Wal-Mart. I planted them into containers when I got home. I thought I had 2 plastic, black ones on hand, but I didn't so, yes, they are in different containers. (Probably not the best way to start off a scientific experiment. But I am not a real scientist and I figured it wouldn't affect this particular outcome.)

I started the project on a Thursday and watered the plants every other day or as they needed water. For a few days I kept them on my kitchen sink's windowsill. I eventually moved them outside since it is pretty warm already in AZ.


The start of my experiment: fresh violas. :) The one in the black container was watered with cooled, boiled water from the stove. The one in the pretty container my daughter made was watered with cooled, boiled water from the microwave.


A few days later: didn't see a change in the plants yet. (I was kinda hoping I would--for some reason I wanted the microwaved water to kill the plant!)


Exactly 2 weeks later: both plants seem to be thriving. Hmmm.

I didn't bother taking too many pics as the plants weren't changing. Trust me, my kids were checking daily, and now my boys don't want to take my microwave warnings too seriously!! 

I honestly wanted to use this little test to have some tangible "proof" to show my kids how horrible it is to use the microwave. Oh well. So much for that!

My thoughts on the experiment: Well, I don't think it is proof that microwaves aren't bad for us. I guess all it proves is that my particular viola plant didn't die from receiving water that had been boiled in the microwave.

My thoughts on the original science fair project: (link above) Since I wasn't there to see it play out, I can't really say. Supposedly, the experiment was repeated several times with the same results. All I know is that my plant didn't die after 2 weeks of receiving microwaved water.

Anyone else ever done this experiment?


Thursday, September 02, 2010

My Kind of School Project

Pin It Now! 2 letters: M&M--you just can't say no to a science project which involves using and eating M&Ms!!

So, this year we are studying land animals of the 6th day. Our first experiment exhibits (on a small scale) camouflage and the process of natural selection. Yada, yada, yada . . .

The book had me at M&Ms, but hopefully my angels learned something that day, besides mom is such a cool home school teacher who lets her students eat M&Ms!!

And the sorting of these delightful mini morsels begins. :)

The color piles each needed the same number of M&Ms. I let them eat the extras.

Now on to tearing an insane amount of construction paper to use as our "environment." Oh, and I forgot to mention that in this experiment my kids are predators and the poor, defenseless M&Ms are prey.

Our makeshift habitat is orange, yellow and green, in case you didn't notice already.

Timer is set for 2 minutes: "Go!" For 2 minutes the kids (each got their own turn) searched for mini M&Ms. After that they had to count how many candies they found in each color, and the whole time I crossed my fingers hoping that they'd find less orange, green and yellow.


For the most part everything worked out according to plan, and I hope Mullin, Lincoln and Shiloh have a better understanding as to why some animals thrive in certain places, while others do not.
One thing is for sure--we had a jolly-good time!

Tuesday, September 22, 2009

Mmmmm, Blubber

Pin It Now! How do pinnipeds stand to swim in such cold water? The answer is blubber, of course!


We completed a fun but messy experiment showing how this works. Both hands are gloved. One is loaded with Crisco (could use Vaseline instead). We timed how long the boys could hold each hand in the icy water.


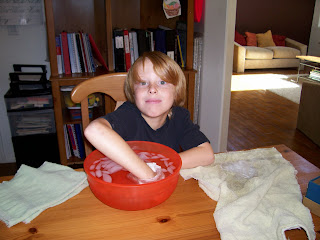
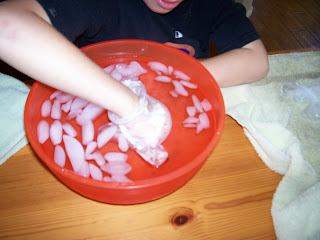
Wow!! The "bare" hand with just a glove was pulled out before even a minute passed. The cold water was just too much to bear. Mullin beat Lincoln by a few seconds, here.


Mullin lasted about 5 1/2 minutes in icy water with the "blubbery" hand. Lincoln had him beat this time withstanding the cold for about 6 minutes.
** When sharing the interesting and fun (I mean educational) experiment with dad at the dinner table, he had some words of wisdom to add...
1. "So the lesson learned is that Crisco is good for you."
2. "If you eat too much, you will end up looking like a seal."
Leave it to dad. :)

Monday, September 21, 2009

Ocean Box: Pinnipeds

Pin It Now!

2009-09-017 009

Shiloh couldn’t wait to make a baby harp seal, just like the one she’d seen in a book from the library.

Of course mom had to help. I think it can pass for a harp seal, although I am leaning towards Jay Jay the Jet Plane’s friend, Puffy.

2009-09-017 011

2009-09-017 013

Anyhoo, here is the baby seal resting atop an ice flow. (You can’t see the white paper on top of the box, which represents ice.)

2009-09-017 017

Mullin went with a walrus. He couldn’t wait to forge those cool tusks out of clay.

Looks like he got sat on by a bigger, fatter walrus, but other than that the walrus looks quite content lying on the rock basking in the warm sun.

2009-09-017 015

2009-09-017 018

A tad difficult to make out, but Lincoln chose a sea lion. Those are a favorite around here. Ar, Ar, Ar!

Gosh, loads of clay can get pretty expensive. Thanks, mom, for providing the kids with clay for all of their ocean box projects!! There will be many more forth coming to delight all of my readers and the 3 followers I have. :)

Tuesday, September 08, 2009

Ocean Box: Cetaceans

Pin It Now!

2009-09-08 005

Today we finally arrived at the end of our Cetacean study, which has been a fascinating one. Whales are such beautiful, magnificent creatures!

Each child got to fashion out of clay one whale of their choice. Lincoln picked the humpback whale. He carefully crafted the large, scalloped fins to clearly represent that his creation was indeed a humpback! Awesome job, bud.

2009-09-08 009

Mullin started off making an orca, which I thought was really good, but he wasn’t convinced and changed his mind to the beloved dolphin. Super dorsal fin, there!

2009-09-08 002

Shiloh was busy making “pebbles” to put on her ocean floor while I figured out a way to suspend our dolphin, so it would appear to be swimming.

2009-09-08 003

We attached googly eyes and finally got the thing hung.

Tomorrow we will begin learning about pinnipeds, and when we’re through, we’ll have another ocean box day. :)

**I highly recommend Jeannie K. Fulbright’s, Swimming Creatures of the Fifth Day!

Sunday, March 22, 2009

Amazing Ant Experiment

Pin It Now! Yep, another home school science experiment. We have been learning about ants and bees for the past few lessons. Arizona isn't lacking in ants by any means, so I thought the "jelly experiment" would be perfect for the kids. (And did I mention EASY!!)
Our experiment involved 3 mini paper plates, strawberry preserves, blue, Crest toothpaste, and Palmolive, lavender dish soap. And of course, ants. The goal of this experiment was to see if ants would cross certain barriers to get to the jelly.

All ready to take them into the backyard. We will have plenty of ant hills from which to choose.

It is a tad bit difficult to see the anthill, but it is in front of the plates toward the bottom of this picture. The ants we have don't really bother me that much any more. In fact, I have even read that they can be beneficial for gardens. Last year they didn't bother the food growing, so I have learned to live with them. It is virtually impossible to exterminate the entire colony, but when the hills get out of control, I do use a little pesticide. I want my kids to be able to actually play outside without being taken over by ants.

Okay, the jelly on this plate is surrounded by toothpaste. See the ant? She would not dare cross the toothpaste. She went round and round the plate as did many other busy foragers, but none ever crossed.

Dish soap blocks the jelly on this plate, and again no ants would cross the stuff.

It was like Christmas for the ants when it came to the plate with nothing but delicious strawberry preserves!!!

I don't know what it is about watching ants, but it was interesting and fun!!

Even Shiloh was entertained by the ants. Well, that wraps up another Rivendell Academy project.


Saturday, January 17, 2009

Cold-Blooded Cricket

Pin It Now! In science class we are studying the flying creatures of the fifth day, and we have already covered birds, bats and Pterosaurs. For the rest of the year we will be studying insects. The kids thought the following cold-blooded science experiment was pretty cool!!
First, Mullin caught a cricket in a glass jar. Lincoln, of course, wanted to catch his own, too. He decided to attempt this feat while I was busy giving Shiloh a bath. It didn't end well. A cricket jumped on him, he screamed, glass jar fell---big mess on patio. :(

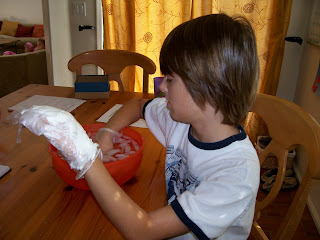
Second, we placed the cricket into the refrigerator for a couple of hours. Then, I calmly cleaned up the mess on the back patio.

We kept checking on Mr. Cricket. His movements were getting slower and slower until he finally stopped moving altogether.

At this point we took him out of the fridge and set the jar on the table. After a few minutes he began moving his antennae. A few more minutes and he was moving his entire body.

Hopefully the kids understand the meaning of cold-blooded a little better now.

Any cricket who happens to trespass into our home usually ends up in the sewer by way of the handy dandy toilet, but I thought I would be nice and let this one go since we put him through so much already. And he was a MALE--they are the ones who make all that noise!!


LinkWithin

Related Posts Plugin for WordPress, Blogger...